- Introduction
- Setting up
- Importing
- Income
- Expenses
- Banking
- Salary
- Cash Management
- Asset Purchase
- Capital/Loan
- Filing Tax Returns
- Year end Closure

Congratulations on getting associated with Reach Accountant, The Next Gen Cloud Accounting Software. This is your first step in becoming a Future-ready Accountant and be enabled with tools needed for you
What is Cloud Accounting?
Think about Facebook, Gmail and Internet banking. Every time you login and access this data, you’re using the cloud. The Cloud becomes possible because of availability of internet. It makes data and software accessible online anytime, anywhere, from any device.
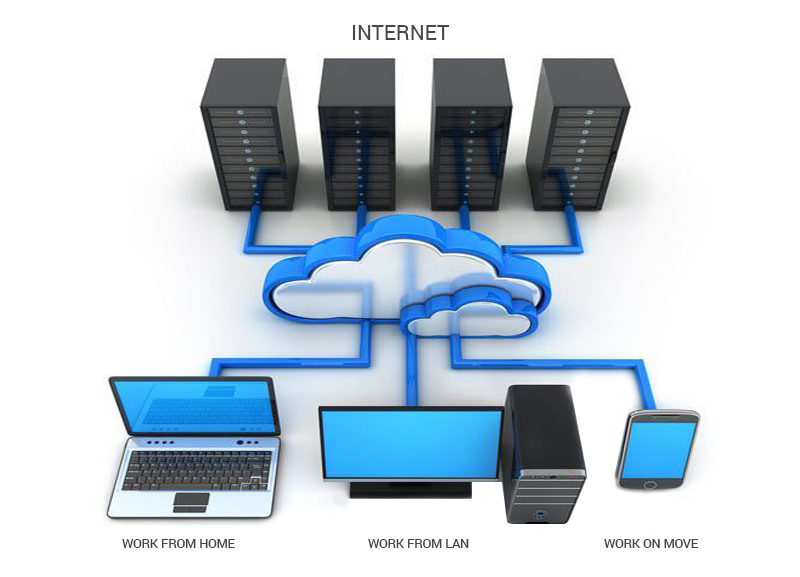
Traditionally, your software was stored in your Hard disk and hence allowed only you to access at any time. A few years later, You were able to share your hard disk with multiple computers within your office using a LAN. With the advent of the internet, you can now allow multiple users to access the same software from anywhere in the world. This is called Cloud Computing
What is Reach Accountant?
Reach Accountant is an Accounting Software. However, Unlike your traditional software like Tally, MYOB etc, it is hosted on the Cloud and so allows you to access and use from anywhere like your facebook or gmail using a browser.
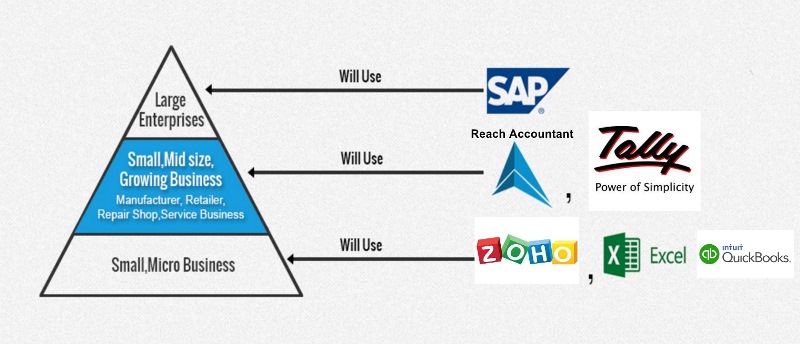
Reach Accountant is made to suit 21 different businesses and hence gives a business the advantage of using a single software without having to customise the software for their needs.
Setting up your Account
Setting up your Account involves creating your software account and getting it ready to use.
Here are some key things you should do:First, you will have to Set up your Company, Branches and Users (next)
Once the company is created, You can download the Desktop icon and mobile app to facilitate easy access from next time (Then)
Reach gives you an option to customize the names of the menu tabs, You can change names, design the Invoice templates to your preference and setup the sms and email templates
Training your Users
Once your Account is set-up, The next step is to train the users. Depending on the size of the company, you can identify the employees who will be responsible for using the software.
The following employees can benefit by using Reach SoftwareThe Billing Counter Clerks
The Accountant
The Purchase Incharge
The Warehouse/ Godown managers
Though all of the employees can use Reach at the same time, for the purpose of training, you will have to identify one super user within your organization. This super user can be yourself or any of your senior employees who understands the business.
The super user can ideally take up a one-on-one training with one of our consultants and can watch all our training videos to get trained in the product. These training videos are available in our website www.reachaccountant.com
Import your Old Data
Once your users are trained in the software and have practiced the entries in the software, You are ready to roll out for daily transactions.
Here is how you do it:Import your Customers, Vendors, Products and Account Ledgers into the software
If you are making this transition halfway through and are already using a software, you can also import your transactions like, Sales and Purchase orders, Invoices, receipts and payments
Once done, check if the Trial Balances, Customer and Vendor Balance and Opening Stock tallies in the respective reports.
After this, you can start using Reach Accountant everyday
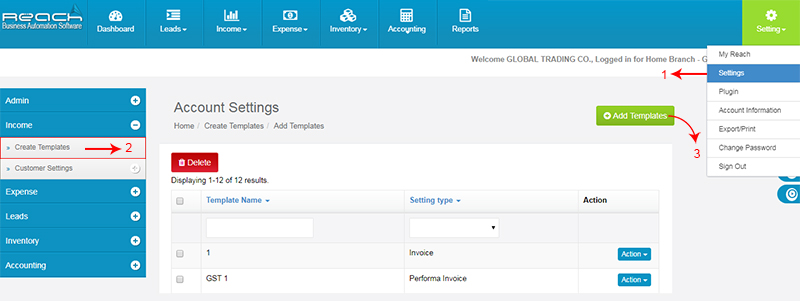
Setting up Templates
Click settings under settings tab.
Click Create Templates under Income tab.
Click add templates and create the new one.
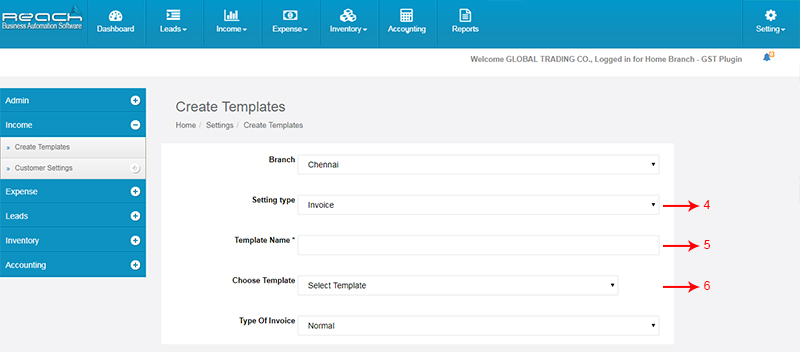
Select the Setting Type.
Enter the Template Name.
Select Choose Template.
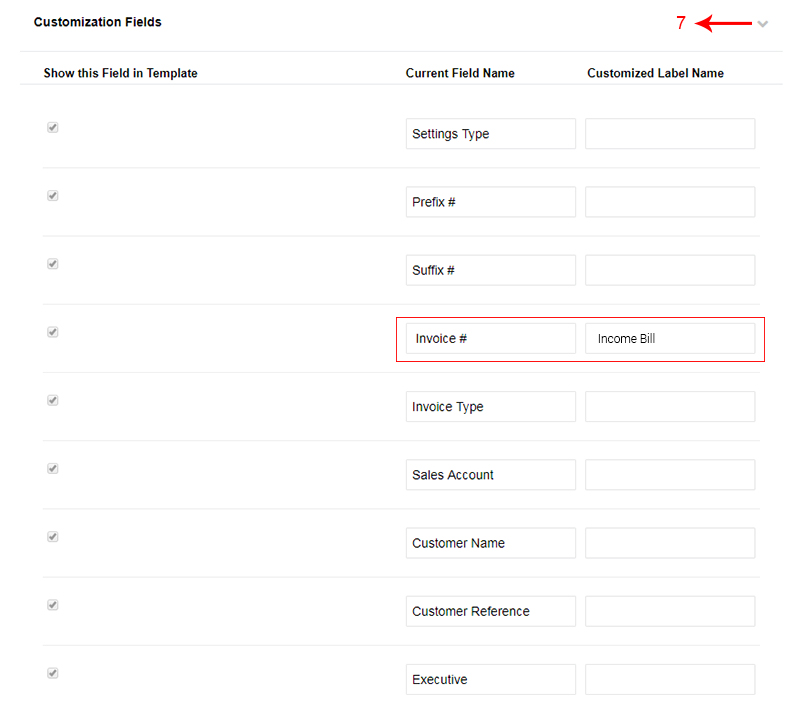
To change the Field Name you can Enter in Customized Label Name respect to Current Field Name.
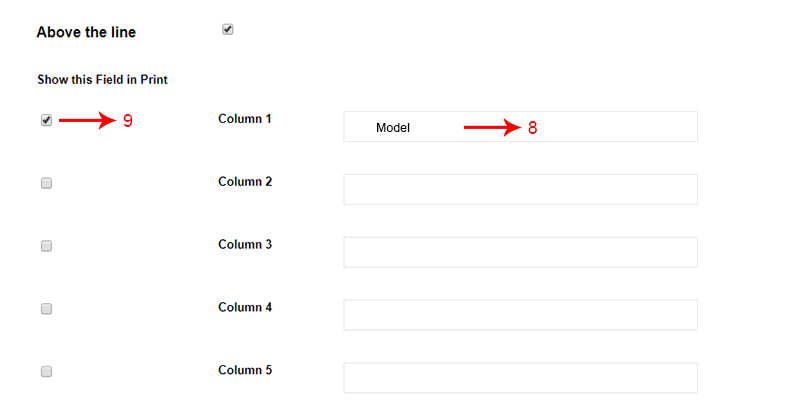
To add Additional Column in Print Invoice use the Column
Enable the Show this Field in Print checkbox
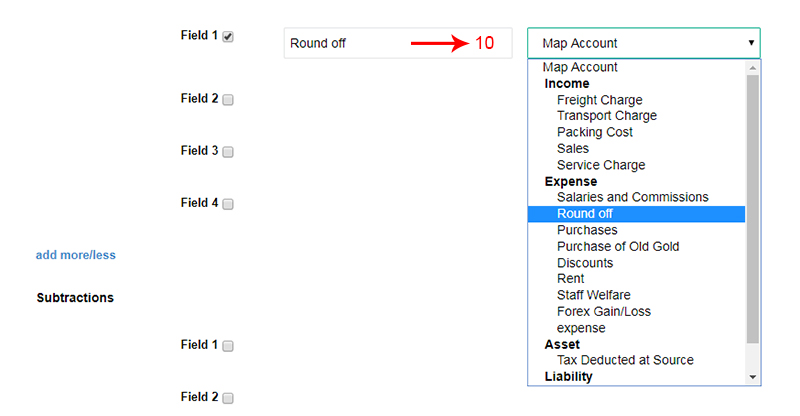
To add Additional Field in Print Invoice use the Field and map the account
Here you can enable the checkbox to print Logo in Invoice
Here you can select Print Size
Now Click create

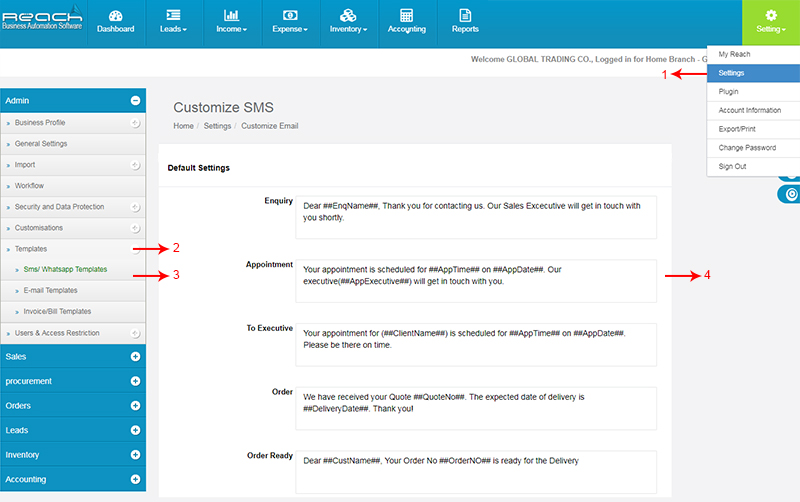
Setting up the email and sms templates
Click settings under settings tab
Click Templates
Go to SMS/Whatsapp templates or E-mail templates
Customize the SMS or E-mail content
Then Save
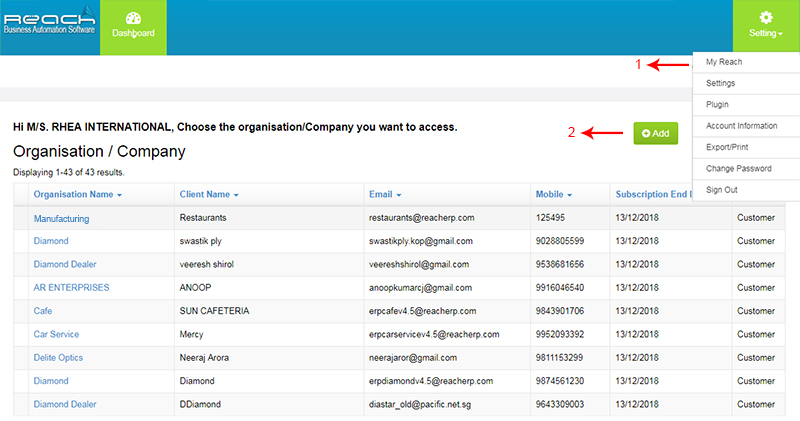
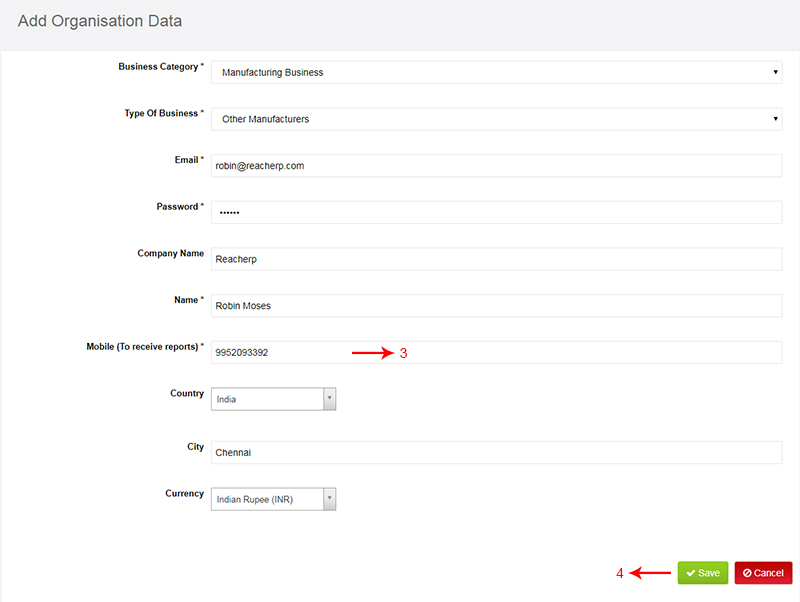
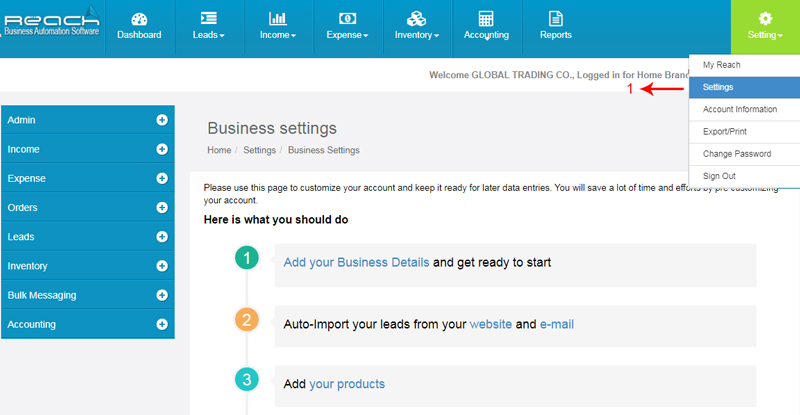
Creating a Organization
Go to Myreach under settings tab
Click add option
The daily reports will be received reports as a mobile number
Click on save once you are done
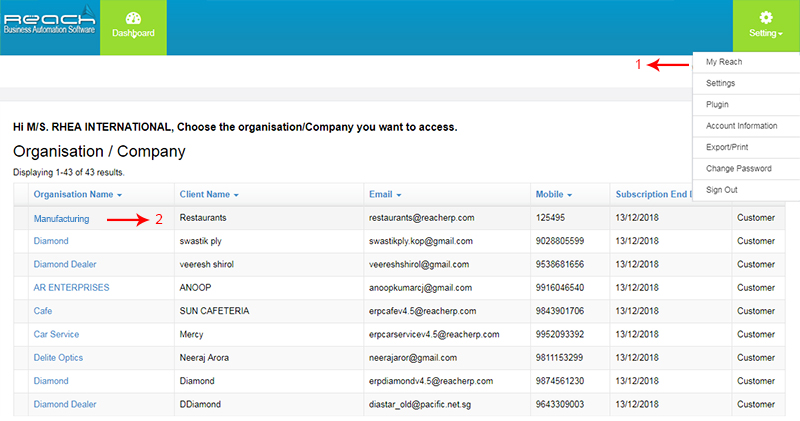
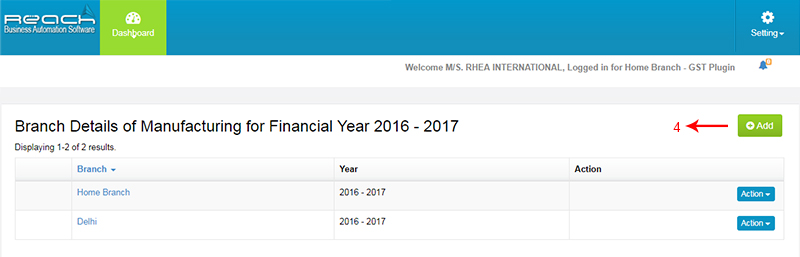
Creating a Branch
Go to Myreach under settings tab
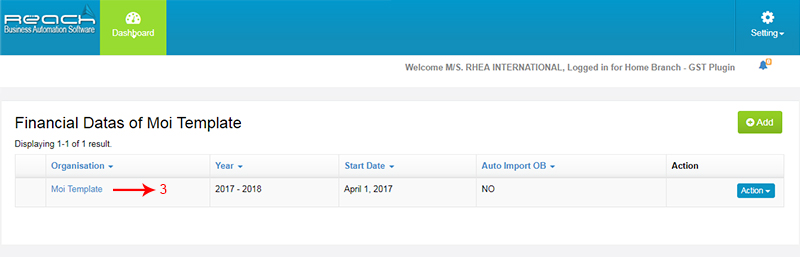
Click Organisation name, know it will go to Financial Year
Then click Financial datas
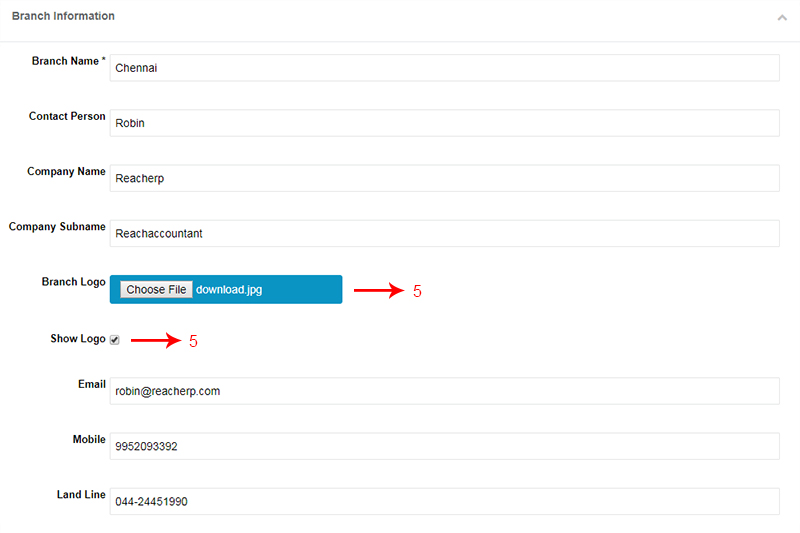
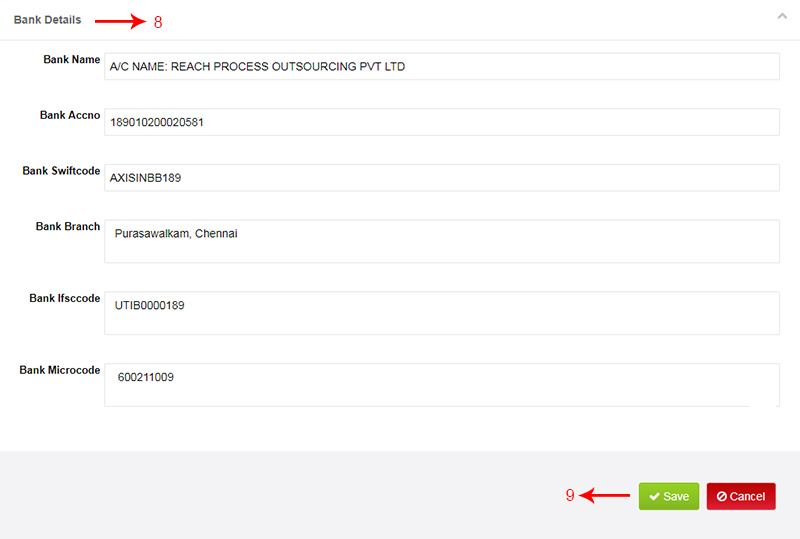
Click add button and create new branch (Fill the relevant details properly)
upload your logo and if you want to SHOW LOGO in your transaction print click the box
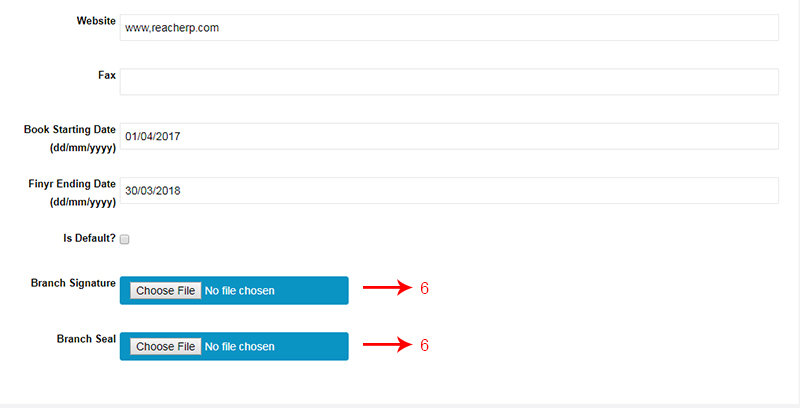
Attach your branch signature and seal
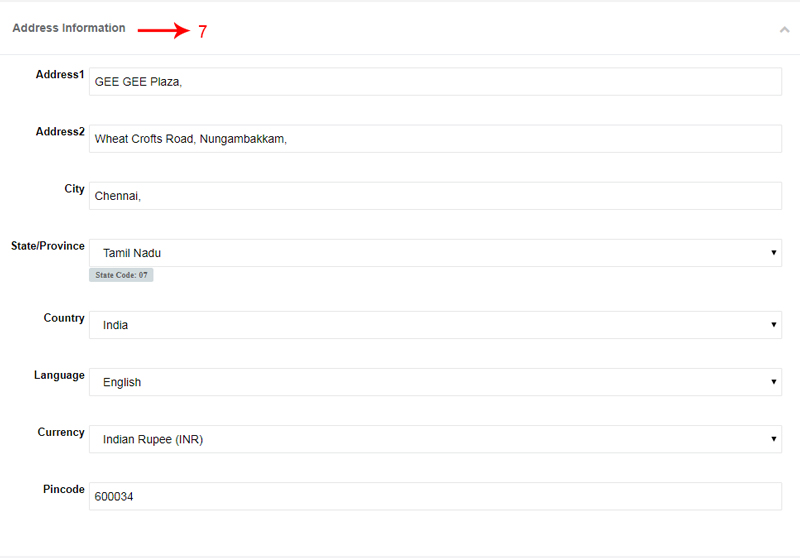
Fill the address information
Fill the Bank Details
Click save
Creating a Financial Year
Go to Myreach under settings tab
Click Organisation name, know it will go to Financial Year
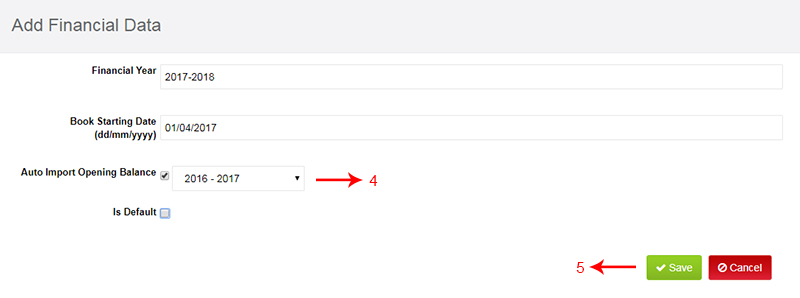
Now click add button and create new financial year
Choose the last financial year, in which all the closing balances will be the opening balance for current financial year.
Click save

Downloading the Desktop Icon
Click Download Setup(.exe)
Then save the downloaded file to get Desktop Icon
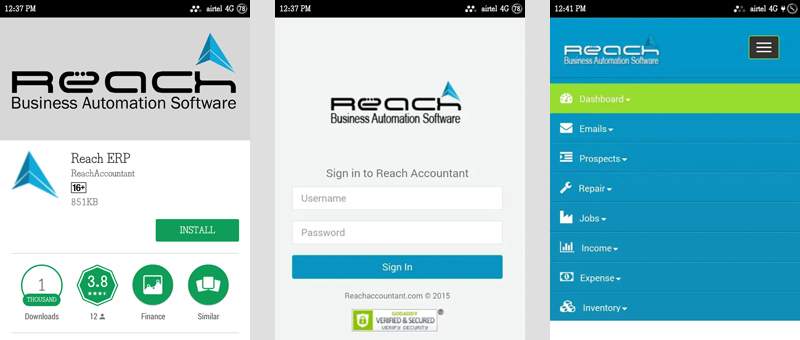
6. Downloading the mobile App
use to google play store and Download the Reach app
After downloading the app, you can login with your user ID on your mobile
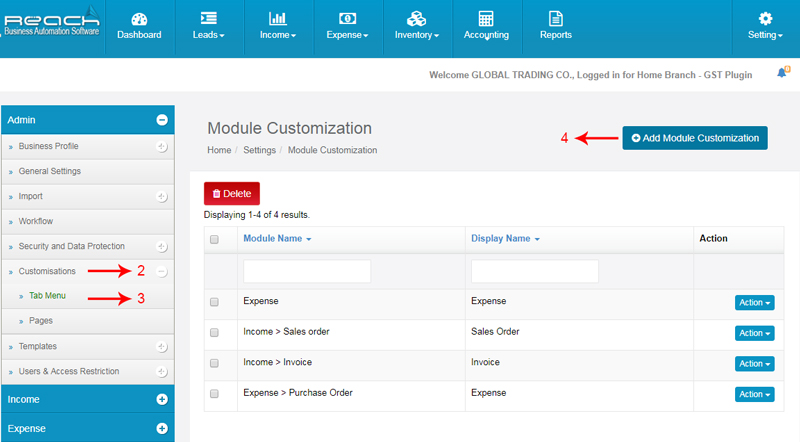
Customizing the menu
Click settings under settings tab
Click customizing
Go to tab menu
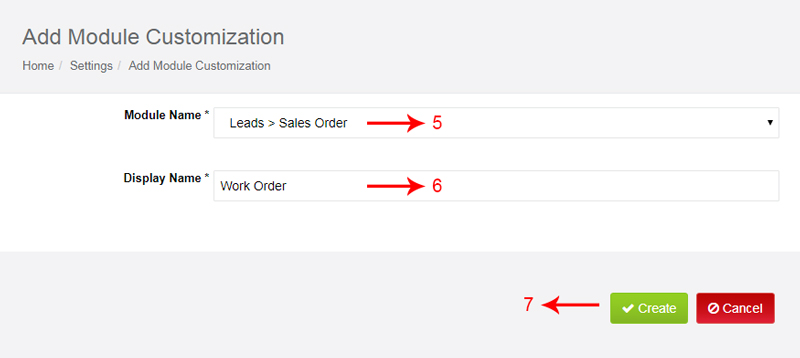
Click add Module Customization
Select the default menu name
You can customize your menu name
Click Create
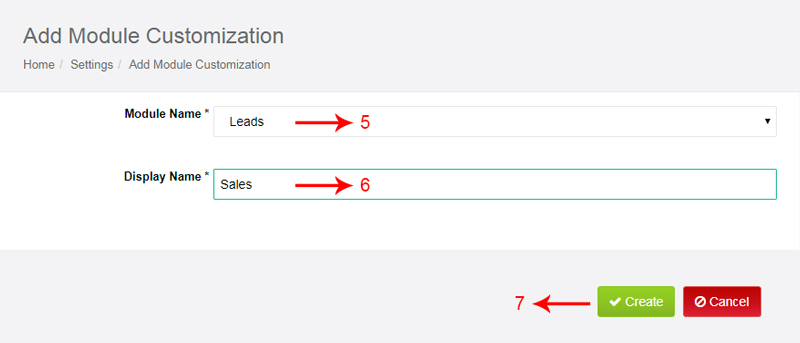
Customising the tabs
Click settings under settings tab
Click customizing
Go to tab menu
Click add Module Customization
Select the default menu name
You can customize your menu name
Click Create
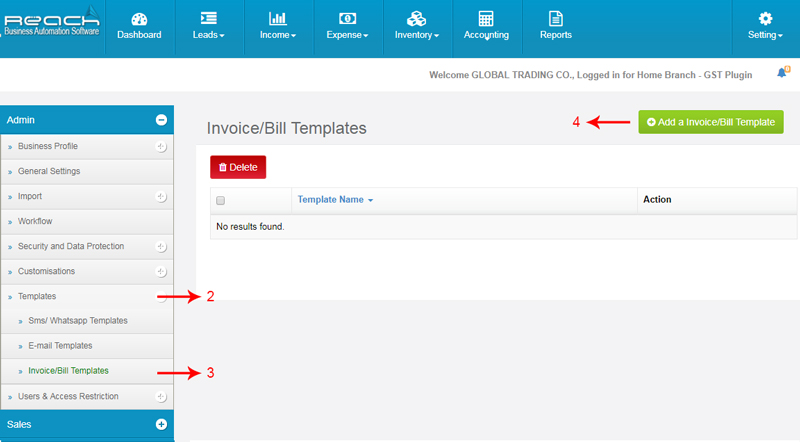
Designing the Invoice
Click settings under settings tab
Click Templates
Invoice/Bill Templates
Click add a Invoice/Bill Templates
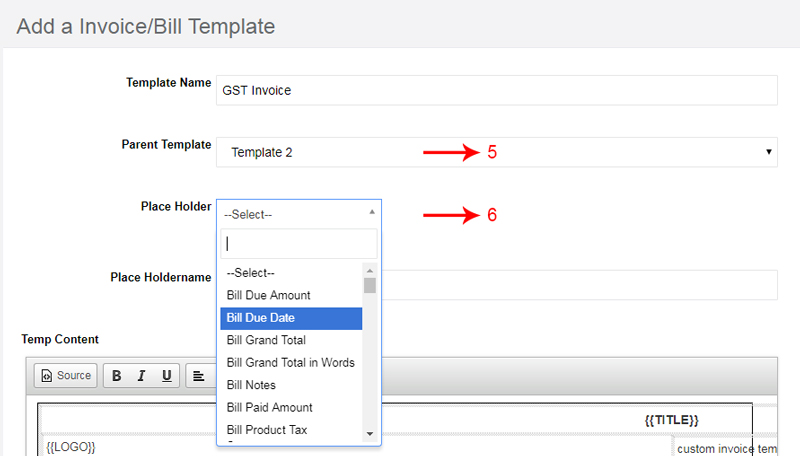
Select Parent Template
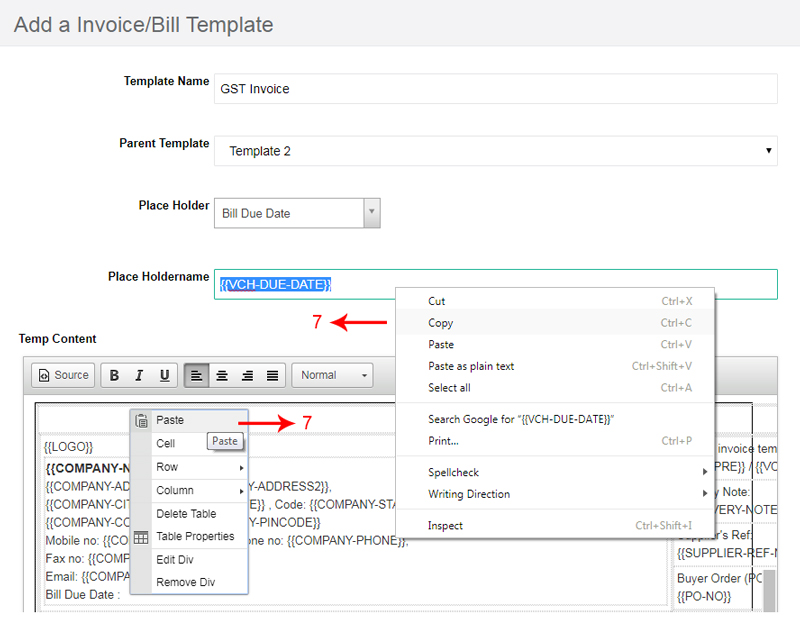
You can select Placeholder
Copy the Placeholder Name and paste on the place
To Design your Templates you can access here
Once your Design is done you can see a preview and create

Once your users are trained in the software and have practiced the entries in the software, You are ready to roll out for daily transactions.
Importing Customers
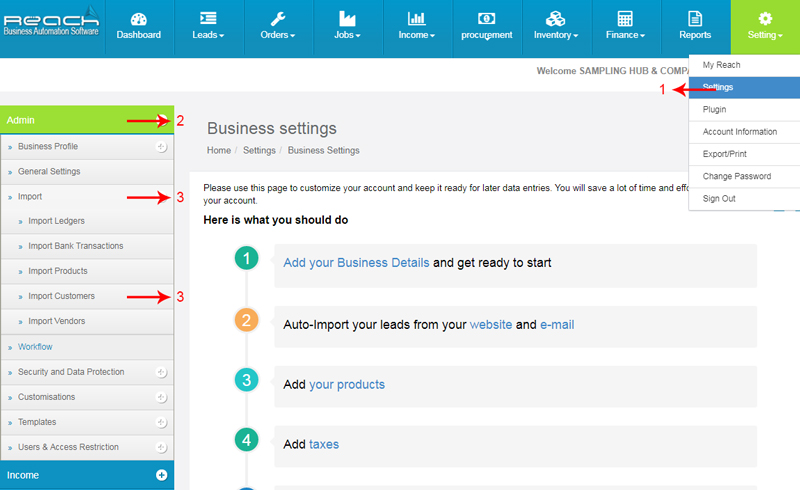
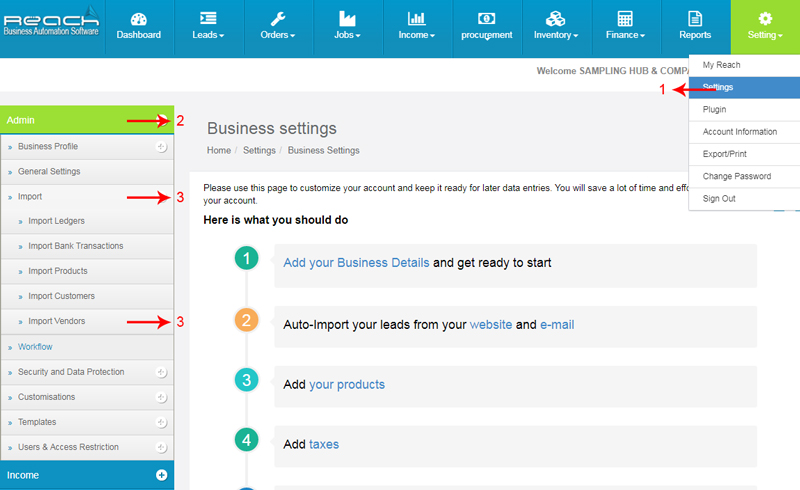
Click settings under settings tab
Click admin
Then click on import and select Import customer
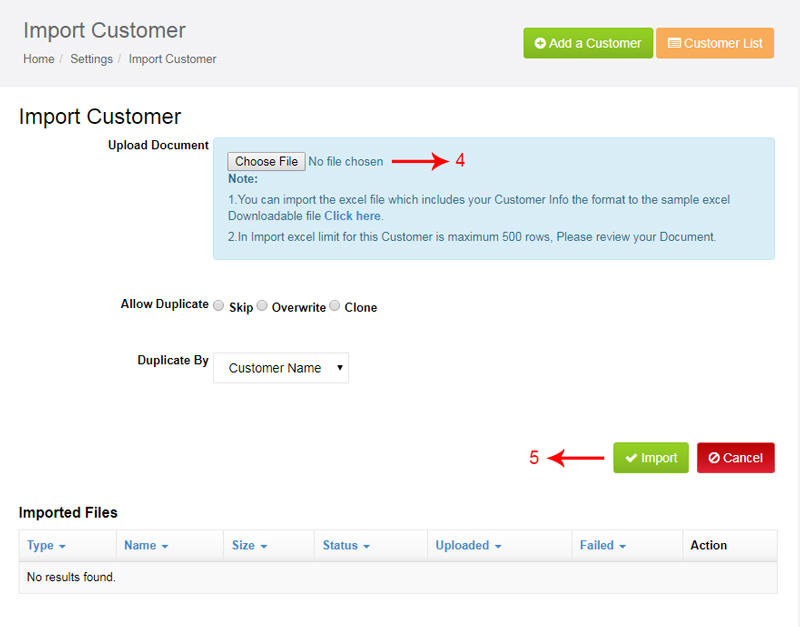
Click on choose file and select the excel
Click import
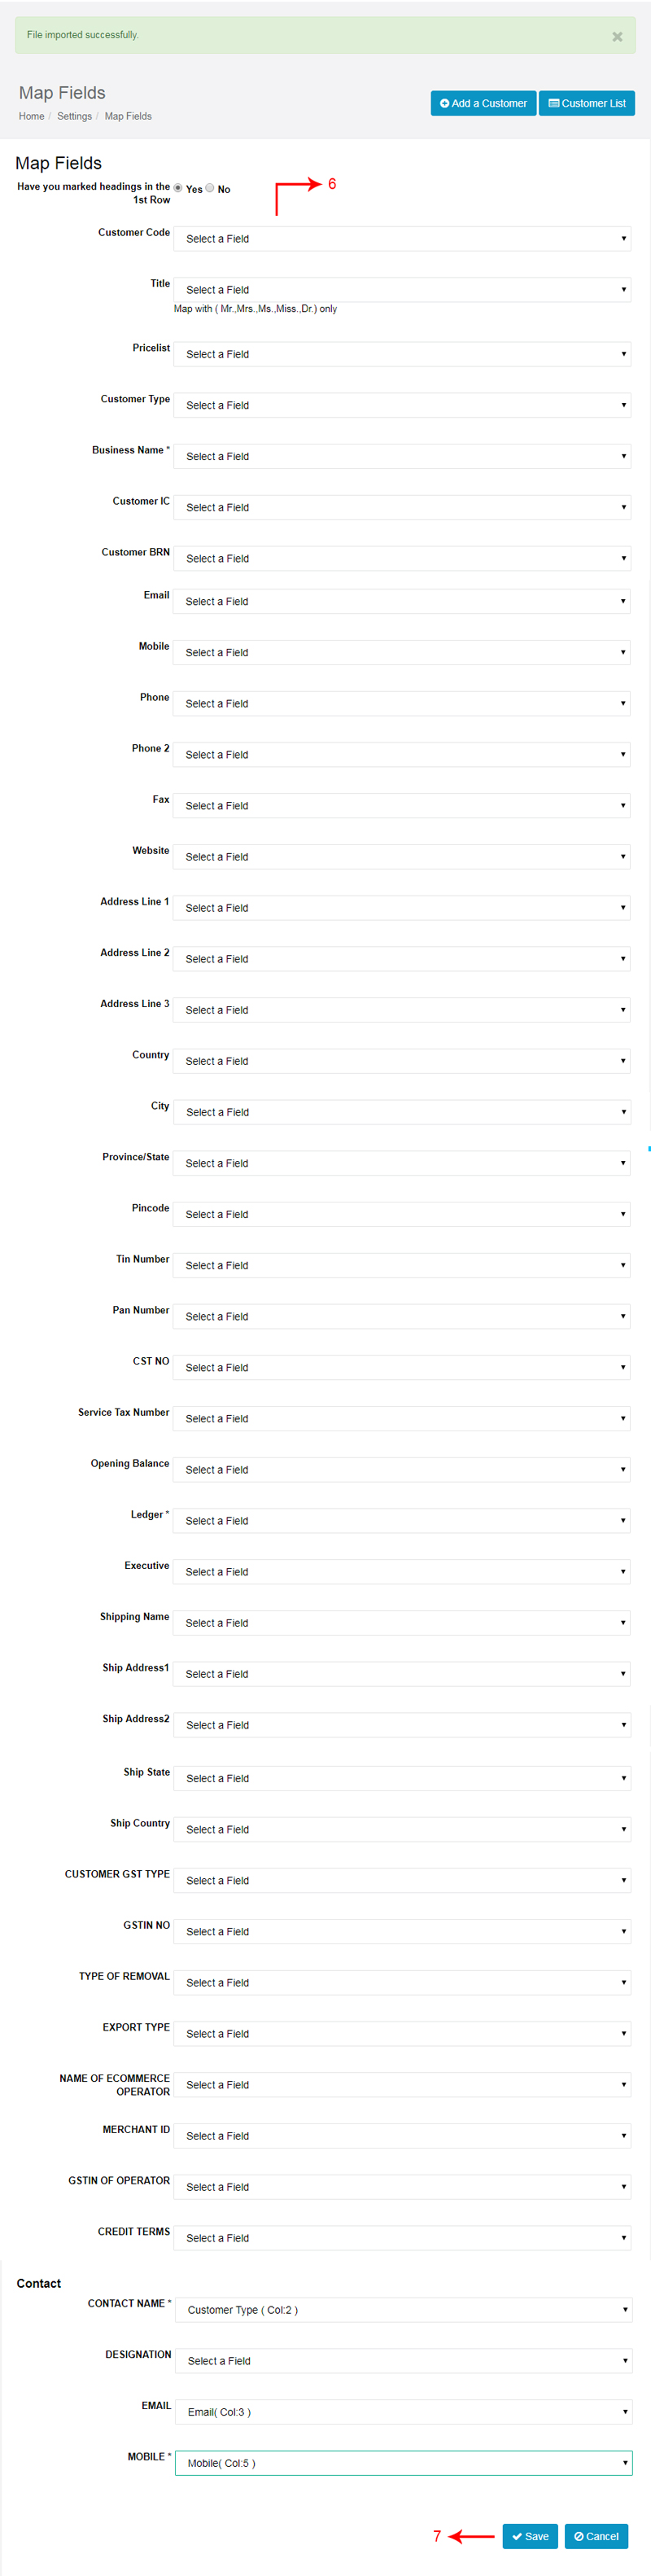
Then map with relevant fields
Click Save
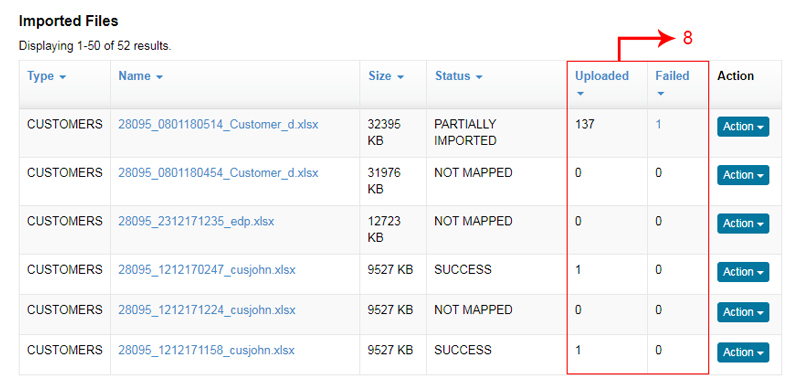
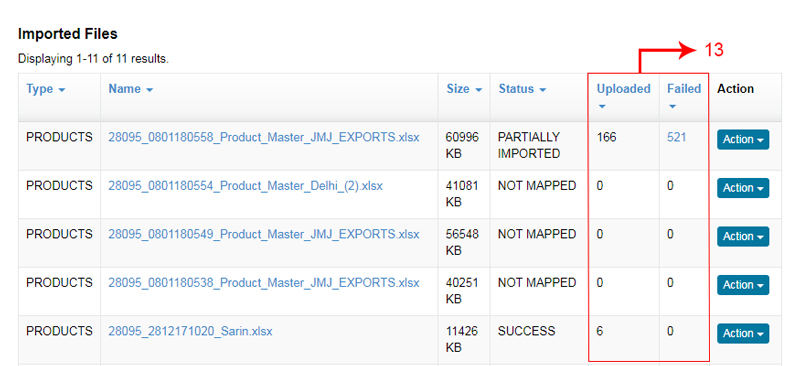
Once the file uploaded you can check how much was uploaded and failed
Importing Vendors
Click settings under settings tab
Click admin
Then click on import and select Import vendors
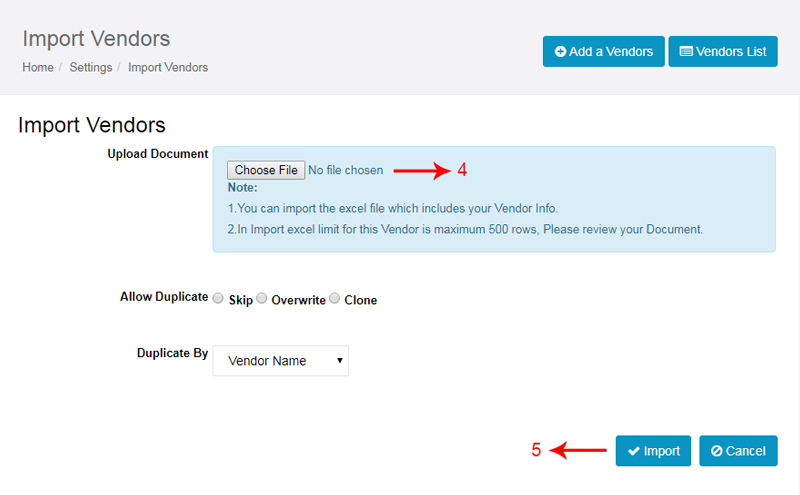
Click on choose file and select the excel
Click import
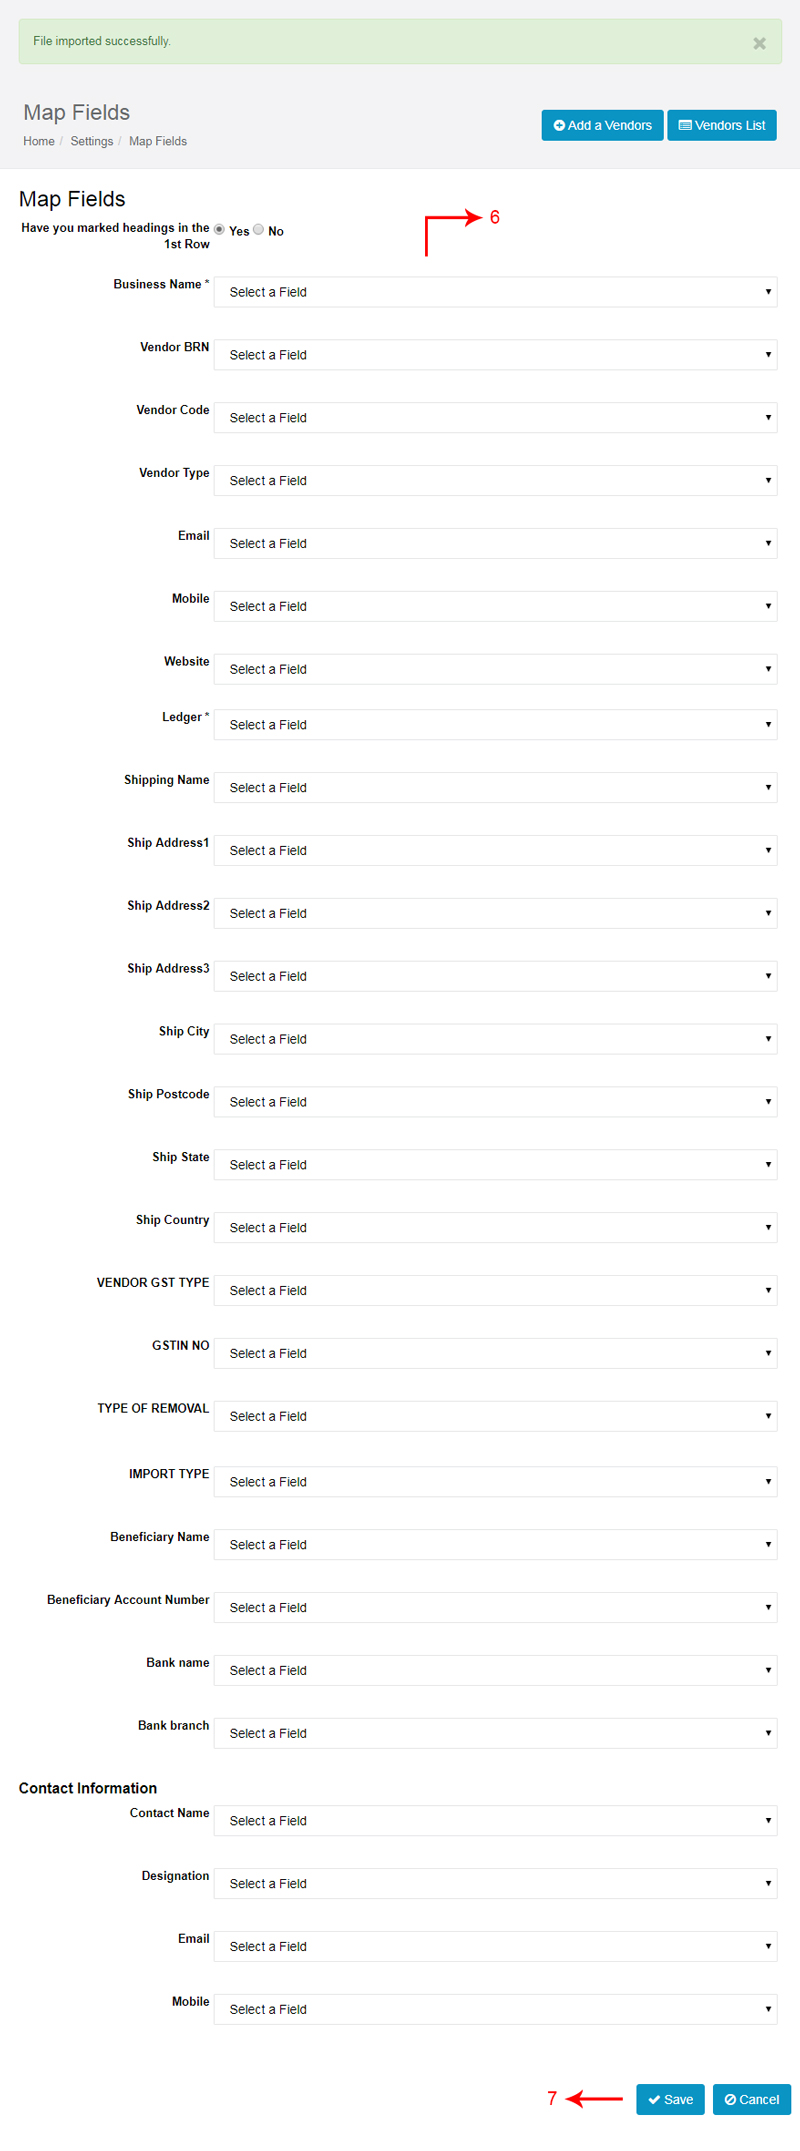
Then map with relevant fields
Click Save
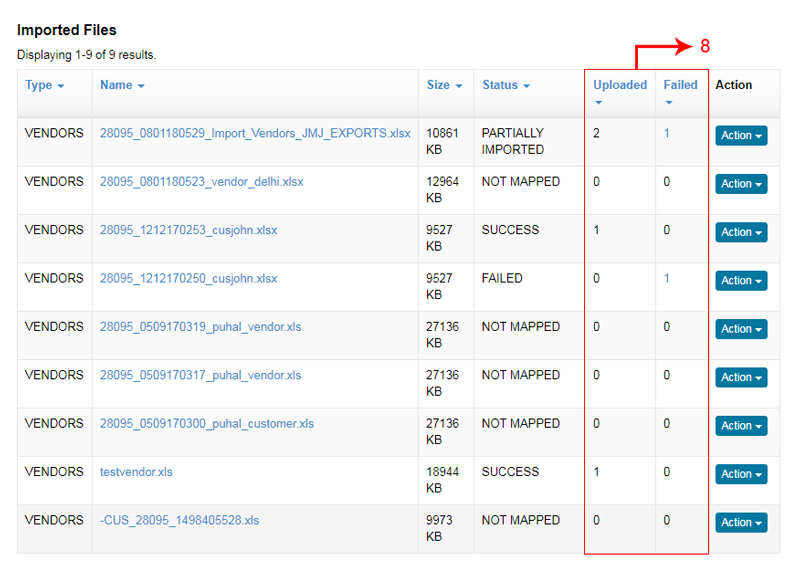
Once the file uploaded you can check how much was uploaded and failed
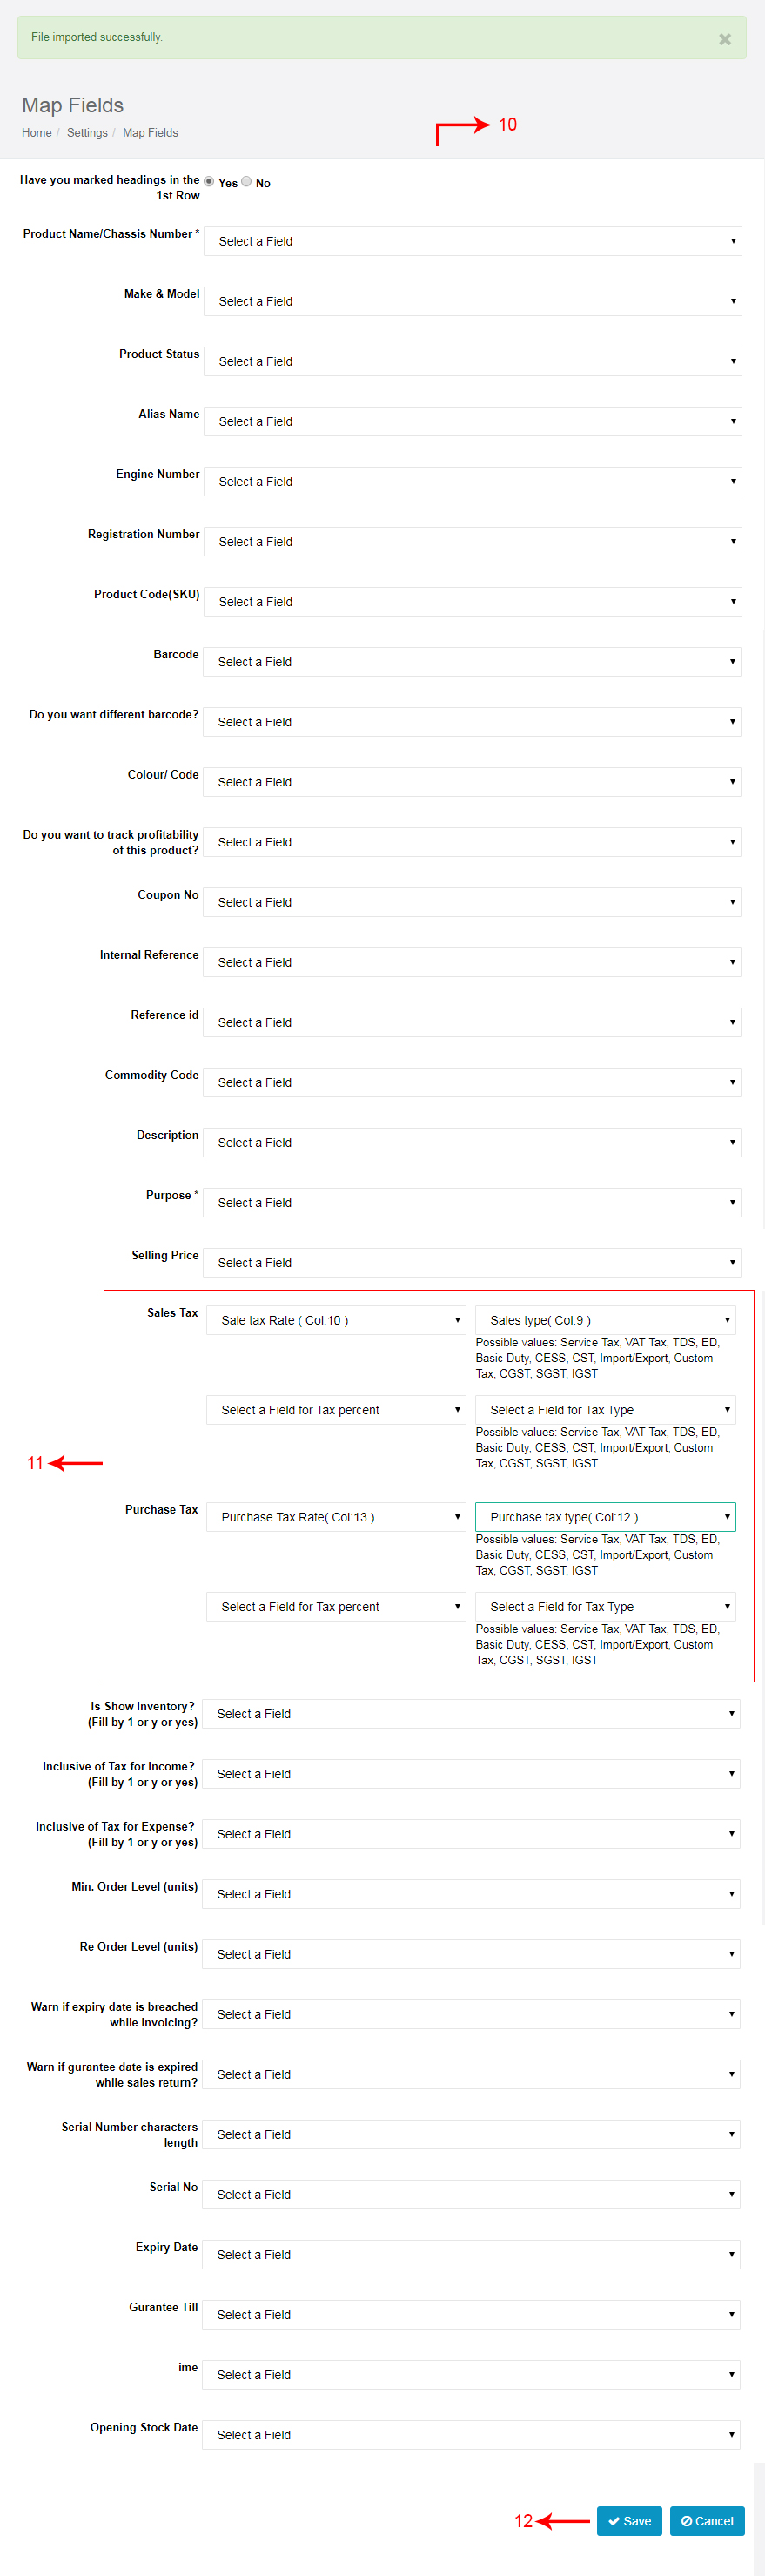
Importing Products
Click settings under settings tab
Click admin
Then click on import and select Import products
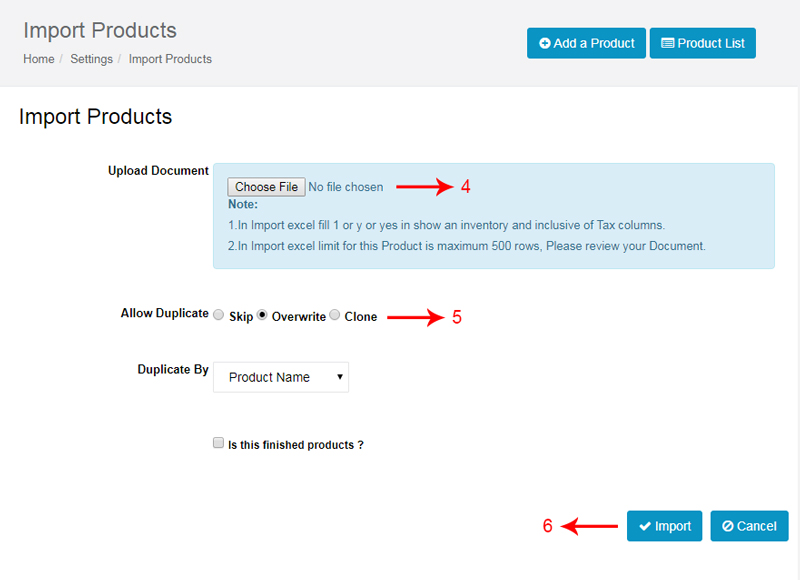
Click on choose file and select the excel
Click on overwrite
Click Import the products button
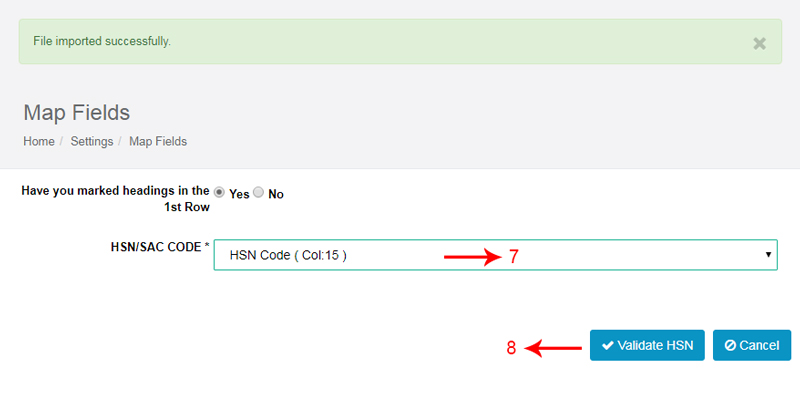
In second page map with HSN code
Now Click on validate HSN
If the code is validated a pop up appears with success message
Then map with relevant fields
Select field for tax percent(18%) and Type(IGST)
Click save
Once the file uploaded you can check how much was uploaded and failed


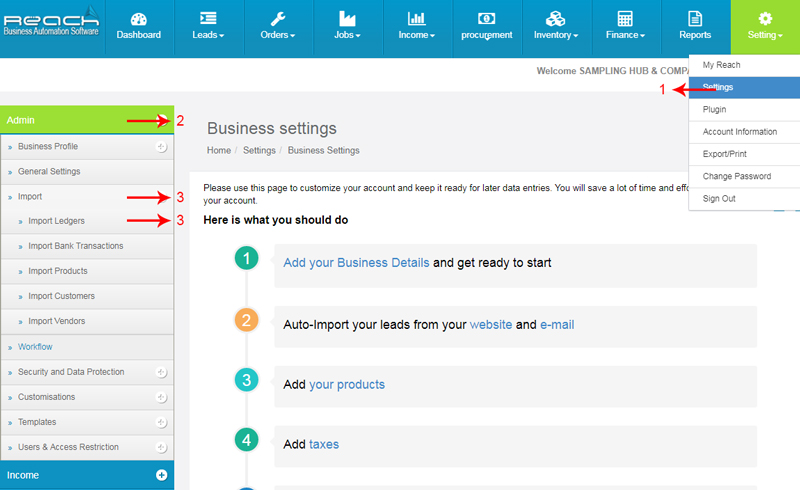
4. Importing Account Heads
Click settings under settings tab
Click admin
Then click on import and select Import ledgers
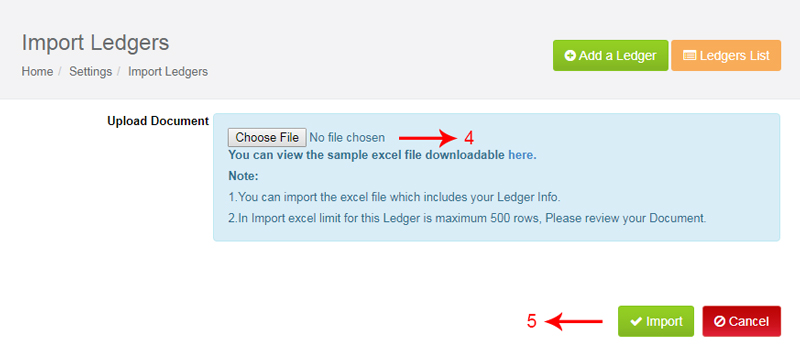
Click on choose file and select the excel
Click import
Then map with relevant fields
Click save

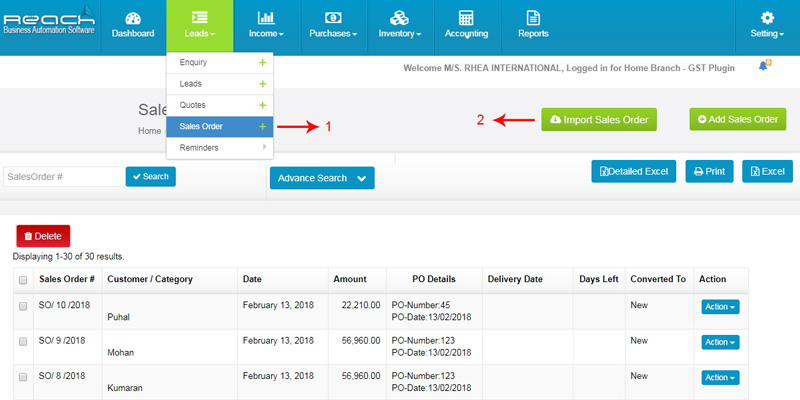
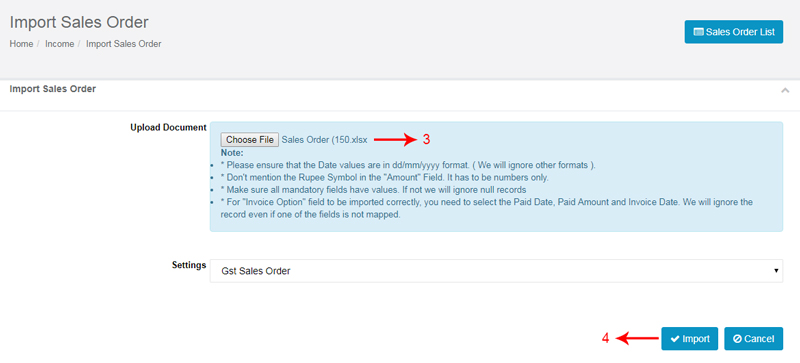
5. Importing Sales Orders
Go to sales orders under leads tab
Click import sales orders
Click on choose file and select the excel
Import the products
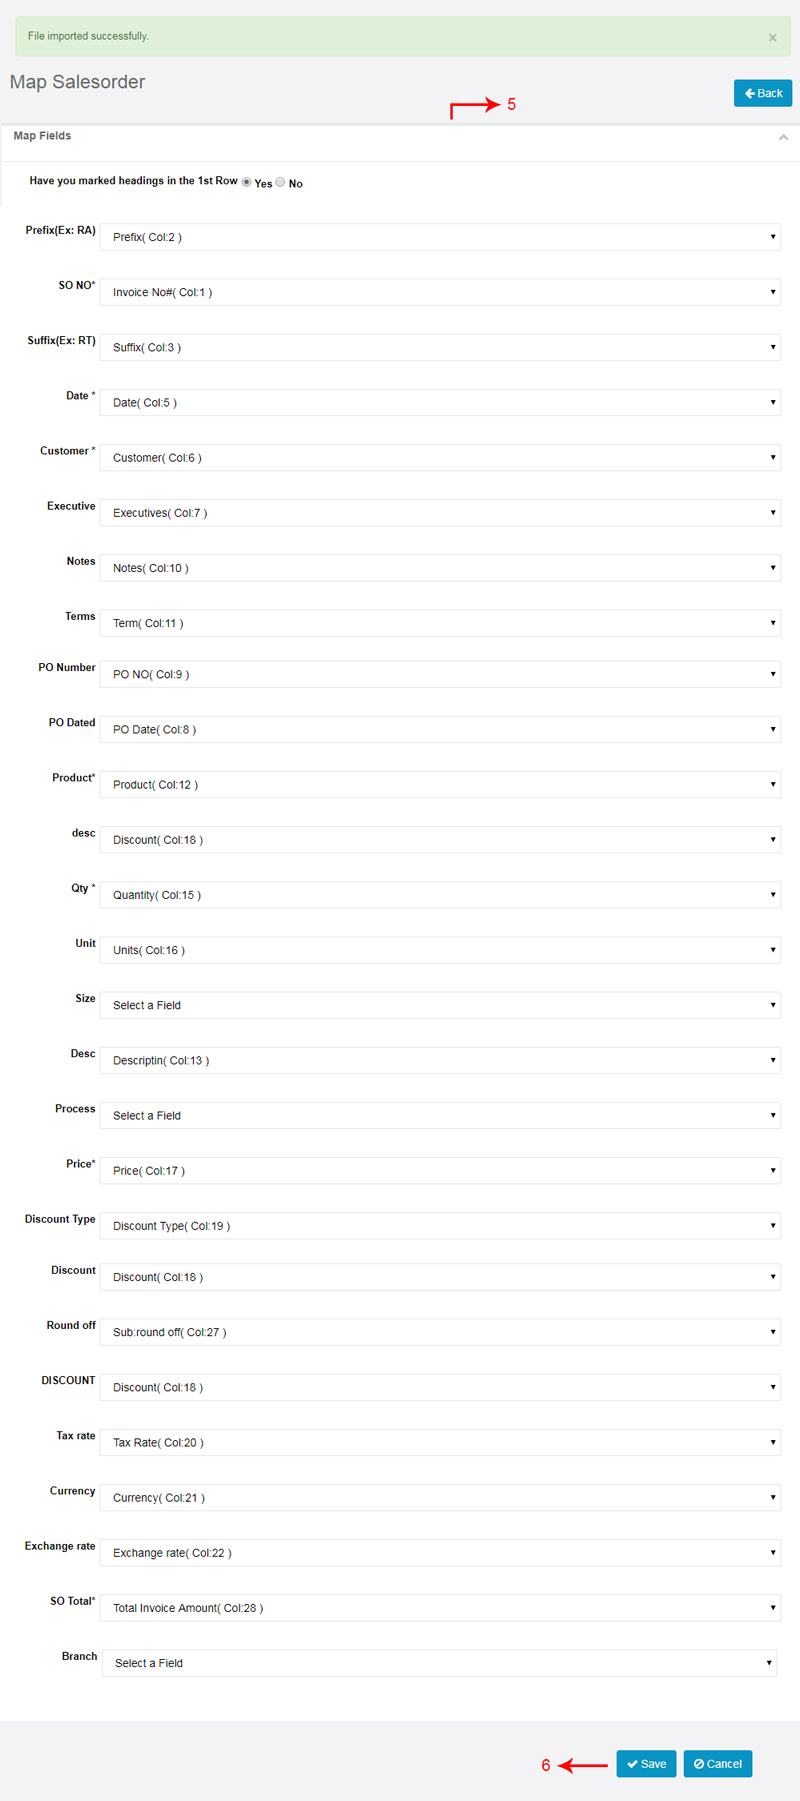
Then map with relevant fields
Click on save once you are done
6. Importing Quotes
Go to Quotes under leads tab
Click import Quotes
Click on choose file and select the excel
Select setting type
Click Import Button
Map with relevant fields
Save

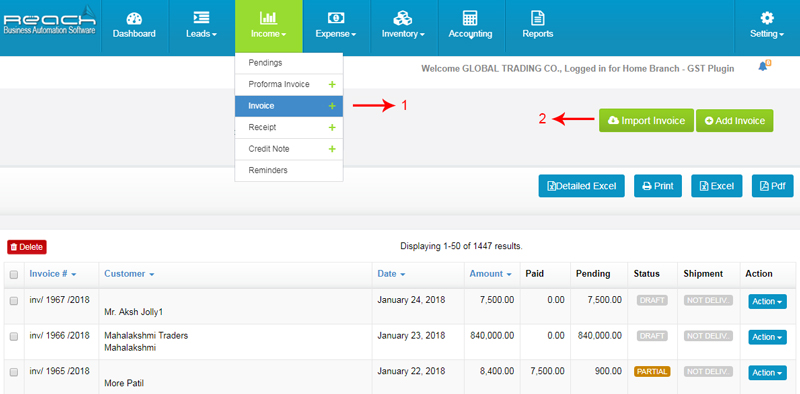
7. Importing Invoices
Go to invoice under Income tab
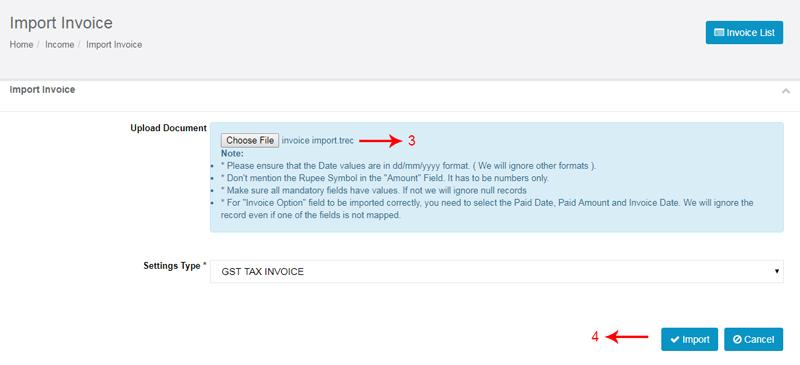
Click Import Invoice
Click on choose file and select the excel
Then Click Import
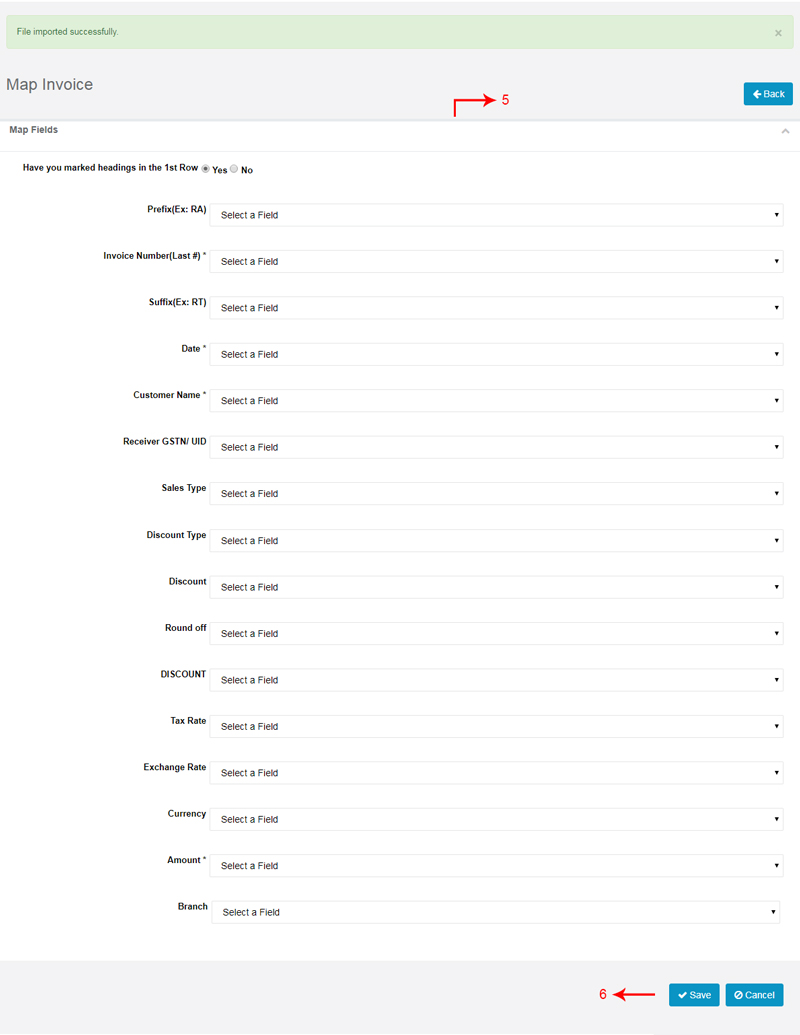
Then Map with relevant fields
Save

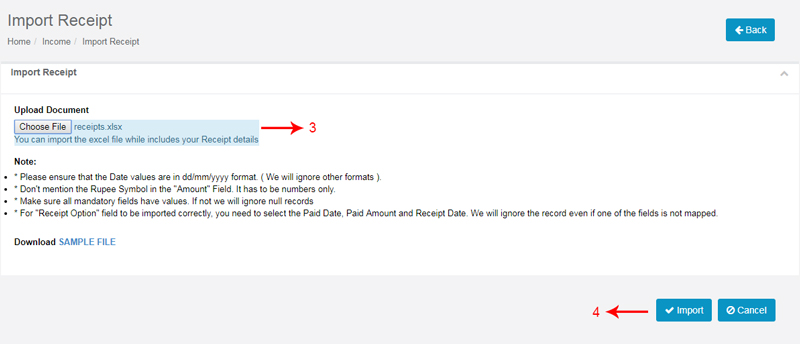
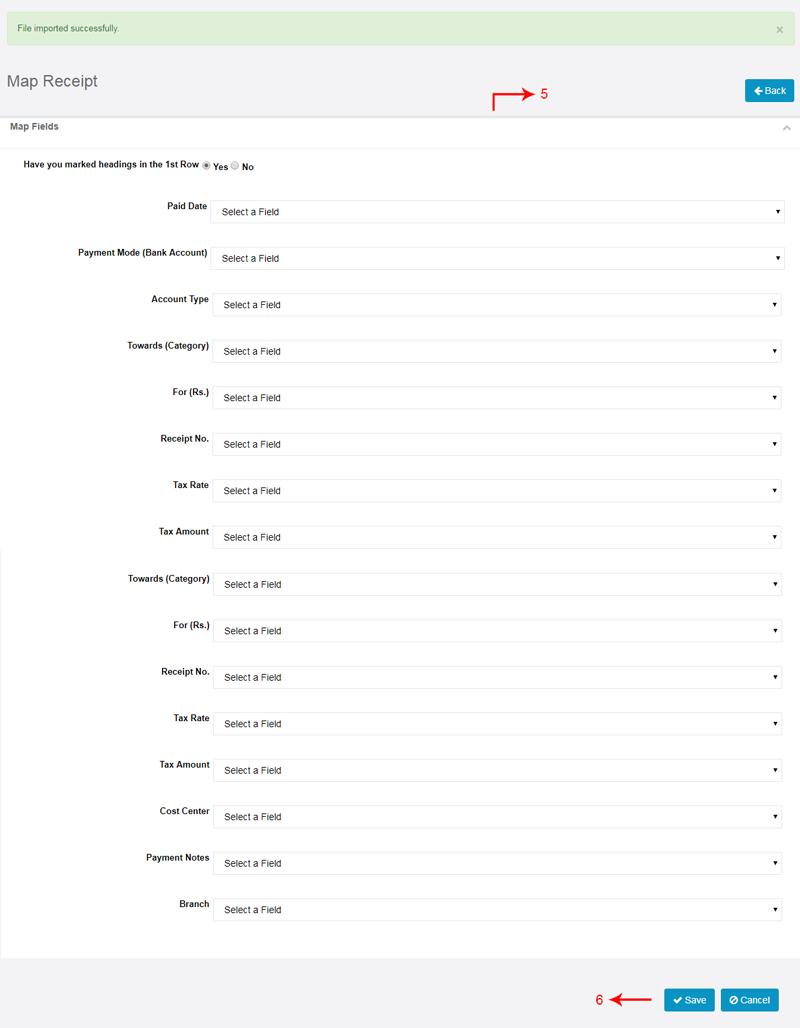
8. Importing Receipts
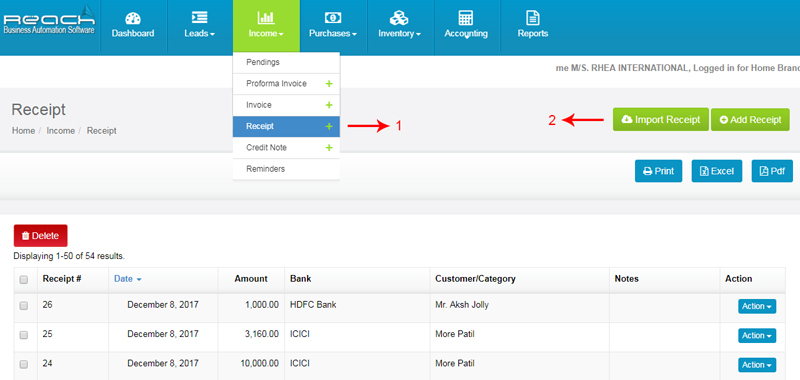
Go to Receipt under Income tab
Click Import receipts button
Click on choose file and select the excel
Click import Receipt
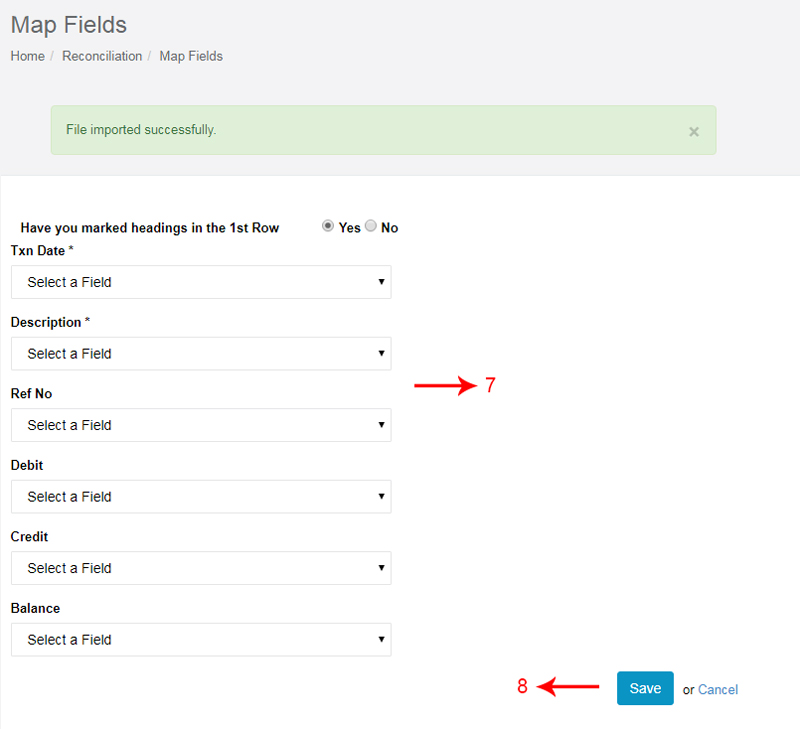
Then Map with relevant fields
Save
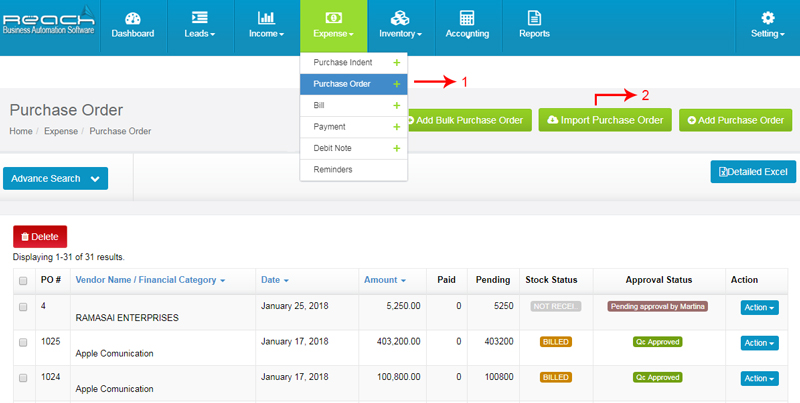
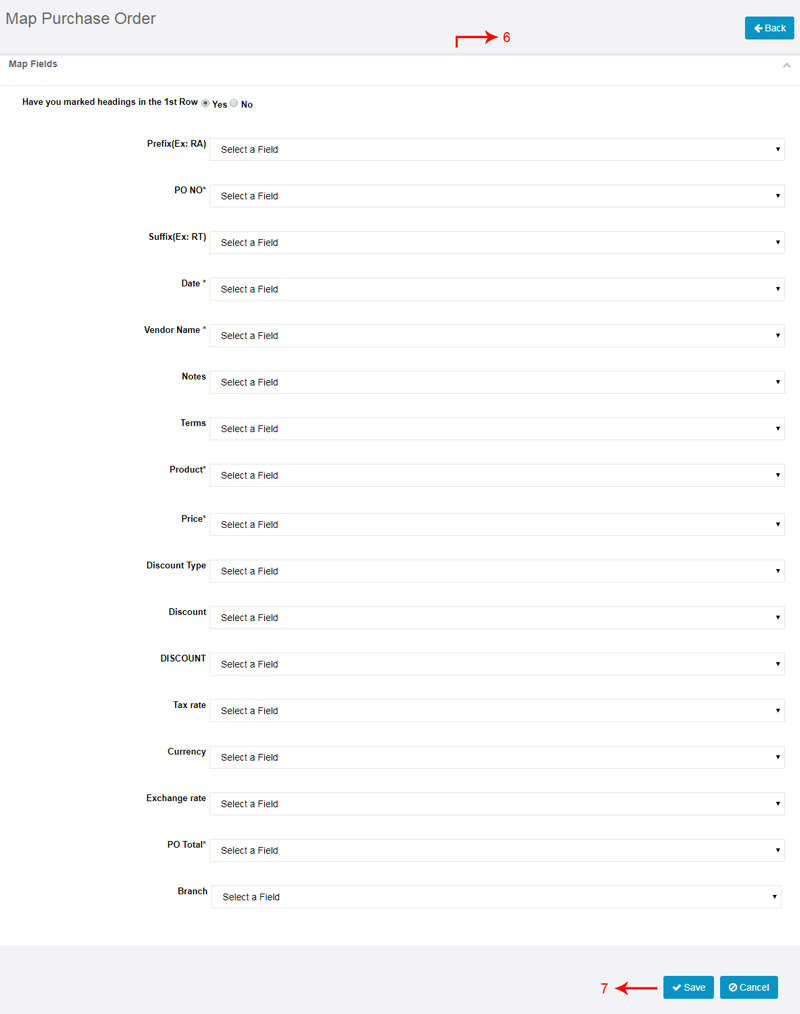
9. Importing Purchase Orders
Go to Purchase orders under Purchase tab
Click Import Purchase Orders
Click on choose file and select the excel
Select settings type
Click import Receipt
Then Map with relevant fields
Save

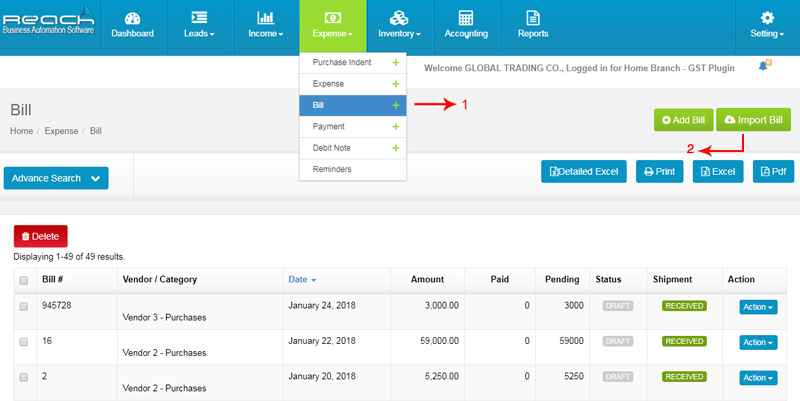
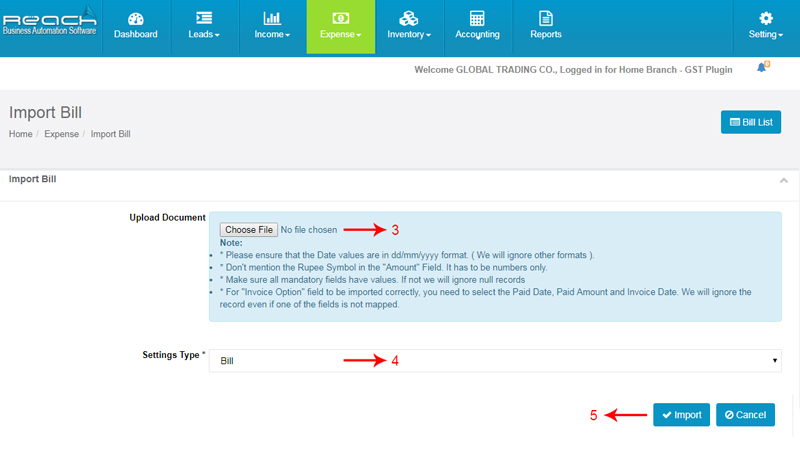
10. Importing Supplier Bills
Go to Bill under Purchase tab
Click Import Bill
Click on choose file and select the excel
Select settings type
Click import Bill
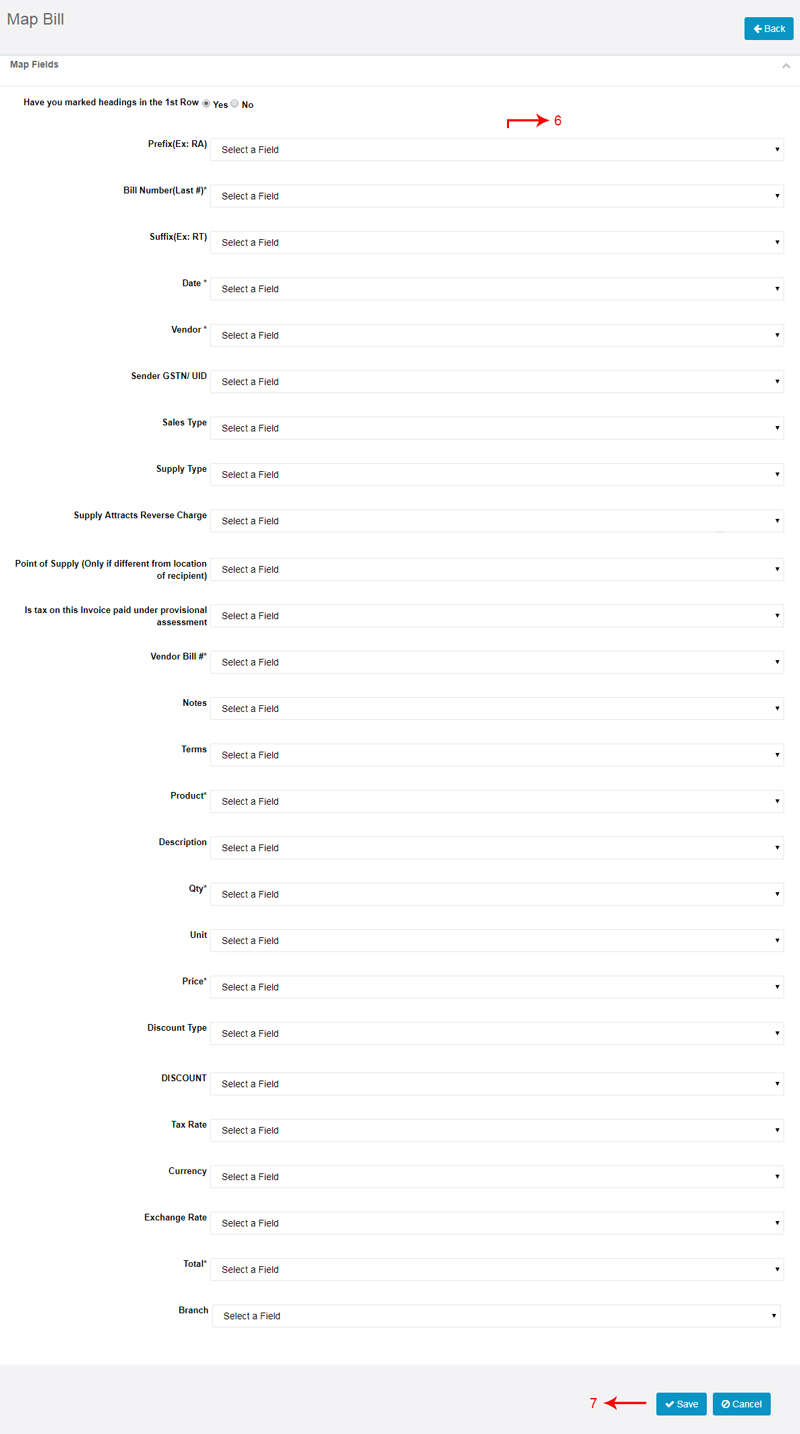
Then Map with relevant fields
Save
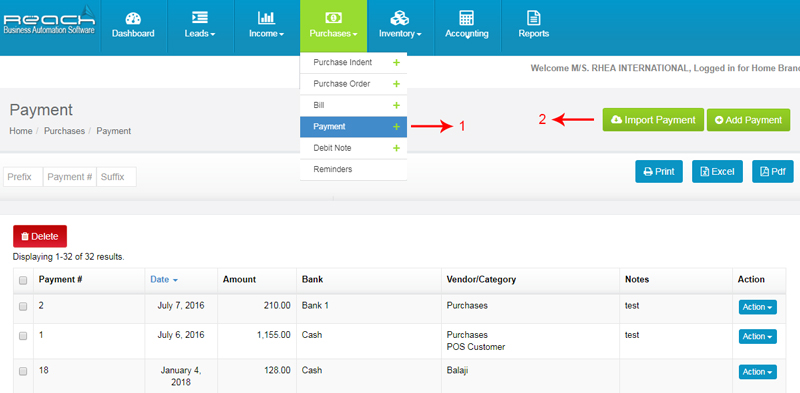
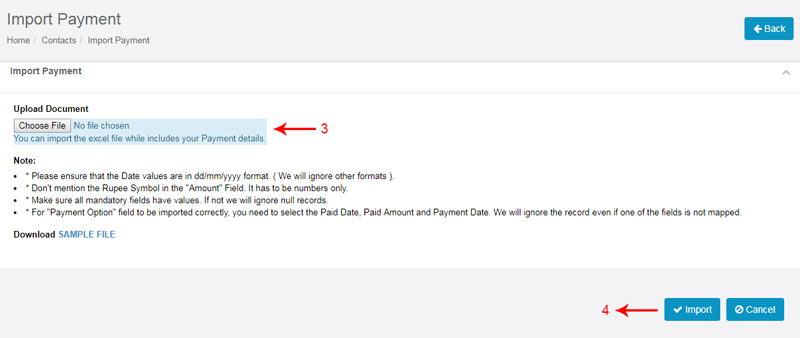
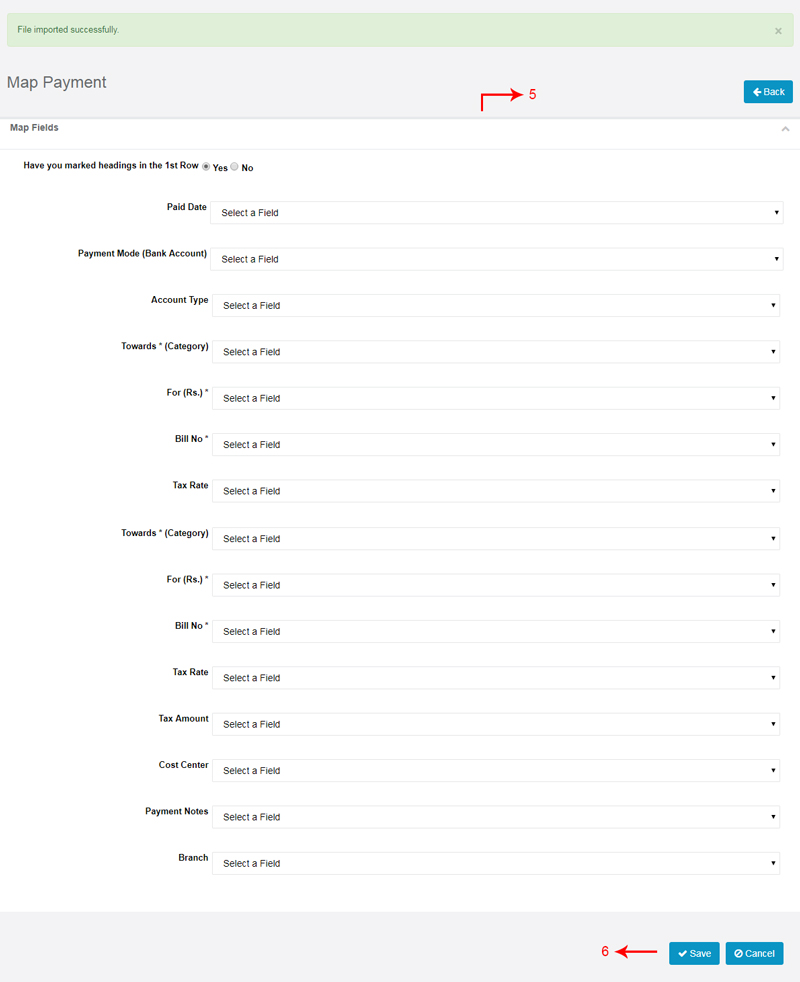
11. Importing Payments
Go to Purchase orders under Purchase tab
Click Import Bill
Click on choose file and select the excel
Click import Payment
Then Map with relevant fields
Save
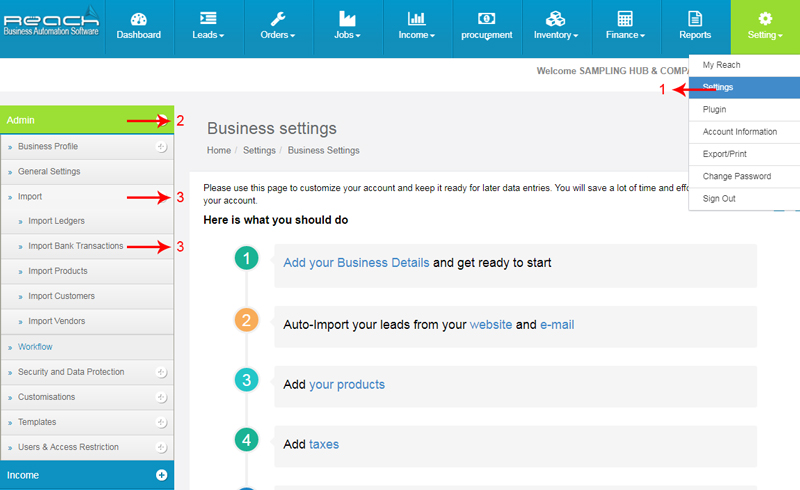
12. Importing Bank Transactions
Click settings under settings tab
Click Import under admin
Then click Import bank Transactions
Click on choose file and select the excel
Select settings Payment Account
click import
Then Map with relevant fields
Save
Learning Objectives:
what an Invoice is
when to raise an Invoice
Understand the format and essentials of an Invoice
How to raise Invoice using Reach Software
Where to check this invoice results
What is an Invoice?
Invoice is issued by a seller to the buyer quantifying the terms of purchase and becomes a legal document for the tax authorities
There are two types of Invoices:
A Retail Invoice or Bill
A Tax Invoice
When you buy a good from your nearby supermarket, The receipt given to you is a Retail Bill. In the same way, when you book a ticket using the services of a travel agent, the transaction document given by him is called a Tax Invoice.
When to raise an Invoice to your buyer?
The answer to this lies in the nature of your business.
If you are selling goods, you have two options
In the normal cases, you have to issue an Invoice before the goods are removed from your place
In the case of continuous supply, you can issue an Invoice before the issuance of the account statement
If you are offering services:
You have to raise Invoices within 30 days from the supply of services
What is the format of an Invoice?
Let us see the format of the retail and tax Invoice format and understand the key items

A GST Invoice must have the following mandatory fields:
Invoice number and date
Customer name
Shipping and billing address
Customer and taxpayer’s GSTIN (if registered)**
Place of supply
HSN code/ SAC code
Item details i.e. description, quantity (number), unit (metre, kg etc.), total value
Taxable value and discounts
Rate and amount of taxes i.e. CGST/ SGST/ IGST
Whether GST is payable on reverse charge basis
Signature of the supplier
If the recipient is not registered AND the value is more than Rs. 50,000 then the invoice should carry:
Name and Address of the Recipient
Address of Delivery
State name and State code
How to raise an Invoice using Reach Accountant?
Now I will show you how to raise a Tax Invoice using Reach Software. You will first have to design and setup your Invoice parameters. This is done only once Once you have setup your Invoice, you can then start creating Invoice for your customers.
1. Designing your InvoiceReach Software provides you a unique option to design Invoices the way you like it. You can either choose to use over 20 pre-designed templates or you can design one yourself.
Let me now show you how to design your Invoice.
Step 1 - Go to Settings>> Admin>> Invoice Template
Step 2 - Click on Add Invoice Template
Step 3 - Now you can start designing your Invoice
Step 4 - Once done, you can save the template.
Give a name for your Template and Choose a Parent template which you would like to amend.Now you can create the place holders and paste it in the places you would like to have it. For example, If you like to change the delivery note column to a Bill due date column, create the relevant place holder and paste it in the template area
2. Setting up the Invoice
Now I will show you how to set-up the Invoice parameters. You can choose to create multiple Invoice sequences also in Reach Software. For example, you can create a different sequence for Export Invoices and another sequence for Local Invoices.
Let’s see how to create a Invoice Sequence.
Step 1 - Go to settings>> Income>> Create Template
Step 2 - Click on add template
Step 3 - Now you can start setting up the basic parameters
Assign the Invoice template to a branch and provide a Template name. Choose the Invoice design from the dropdown. You will see the design created by you in the list. Choose the designed Invoice.
Now you can further add parameters relating to Taxes.
Once that is done, you can assign a pre-filled pricelist to this template if that is relevant. A pricelist is created separately if you have differential pricings for customers divided by type or geography. I will teach you about the pricelist in a separate video.
Once you assign a pricelist, you can configure the decimal points for this Invoice template. You can also pre-set the type of Invoice and assign it to a specific account head. Following which you can pre set the terms and notes. Please note that you can also choose to add these details at the time of voucher entry.
Now open a sample Invoice format
Now, you can add additional columns and fields to your Invoice. Let me show you how. The above the line columns can be added here and this will reflect here in the invoice. Below the line columns can be added both as an addition item or a subtraction item and will reflect in your Invoice like this. Now you can choose your email and print preferences. You can choose the size of the paper which you will use to print your Invoice and also decide on the number of copies you choose to print.
Once you finish the print settings, you can now choose the Invoice number sequence and add a starting number. In case you are a Importer or Manufacturer, you can choose the value at which the tax should be calculated. The serial number checkbox is used if you deal with electronic products or spare parts and wish to track your Inventory based on batch or serial sequences
Finally, you can choose if this is a default template Once done, you can now save it.
3. Raising an Invoice
Now that you have set-up your Invoices, you can start creating and issuing Invoices to your customers using Reach Software.
Let me now show you how.
Go to invoice under income tab
Click on Add Invoice Button
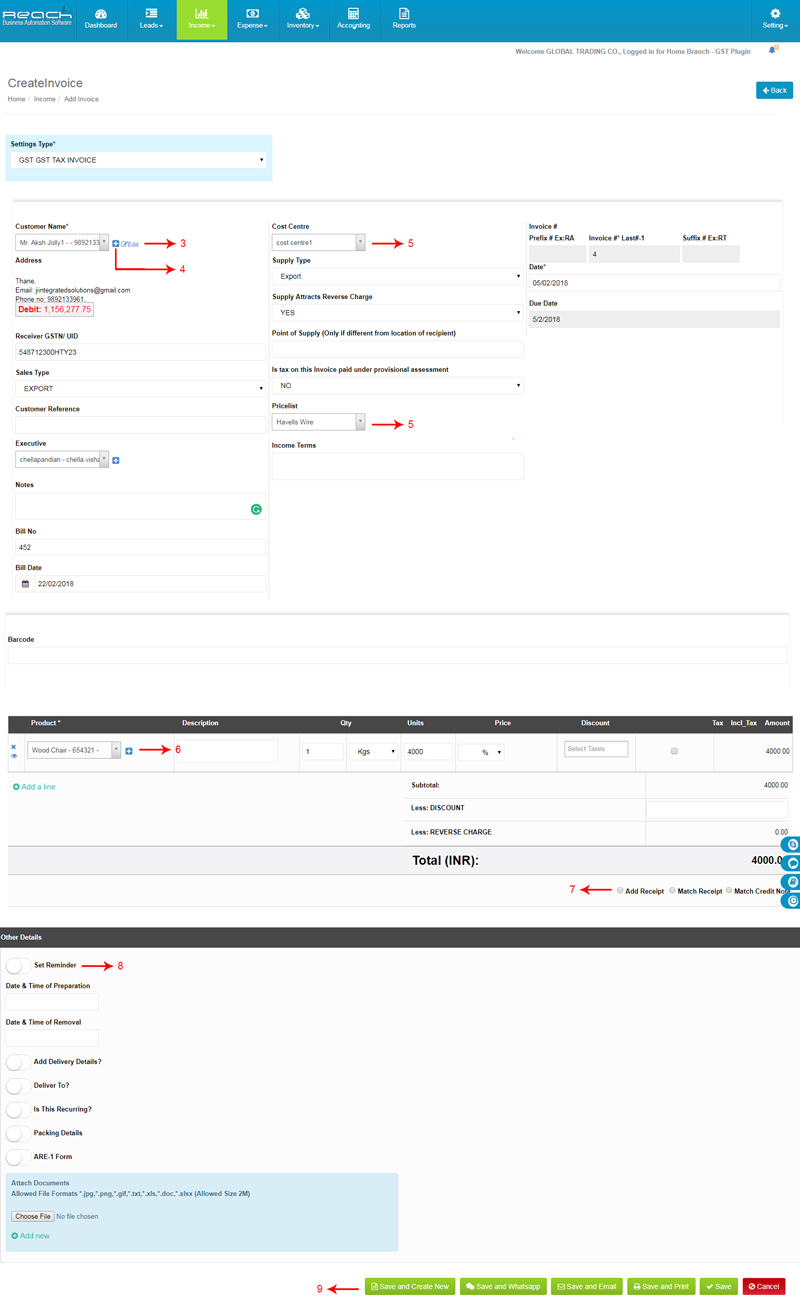
Choose the customer to whom you are raising an Invoice.
Reach will automatically populate the customer’s details and also show you the balance outstanding for the customer. In case this is a new customer,
You can add the details of the new customer by clicking on the "+" button near the customer field.
You can match this Invoice to a specific cost centre and choose the pricelist relevant to the customer. (you also have an option to pre-assign the pricelist to the customer and reach will automatically pull it out)
Once marked, you can start adding all the products which you sell in the Invoice now. while adding products, you can add discounts and choose taxes.
Once an Invoice is completed, you can now create a receipt for the Invoice or adjust the Invoice against advance payments or outstanding credit notes.
Reach also has the option of pre-setting reminders for your Invoices through email and sms.
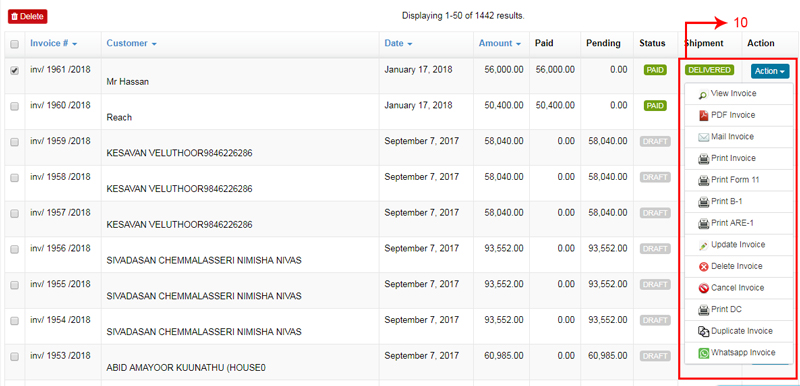
You can print the Invoice and send it to your customer. Alternatively you can also choose to email, sms or whatsapp the Invoice directly to your customer.
The Invoice shows the payment and the shipment status. You can do further changes to the Invoice from the Action Tab.
The Invoice will have three segments, The first segment shows details and type of the Invoice. The second shows the Billing particulars and the last segment shows other key details. Let us now raise a sample Invoice.
Now your Invoice is completed and ready to be sent to your customer.
Once you save the Invoice. The Invoice appears in the list of Invoices.
Receipts
In this section, Lets learn What is Receipt Voucher and How to raise receipt using Reach, Cloud Accounting Software.
Learning Objectives
What is Receipt Voucher and When Should Receipt Voucher be Issued?
How to raise the receipt voucher using Reach software
Where to check the receipt report
What is a Receipt Voucher?
A receipt voucher is given when you receive money from a person. The money can be recieved as Cash, Cheque or as Bank Transfer. This voucher is the proof that payment has been received.
You might receive money
When you make a cash sale
Against a previous Credit Invoice
As an advance towards future supply
On sale of Asset
As a Hand Loan
Various other scenarios
In most of these scenarios, the payer will request a receipt from you.
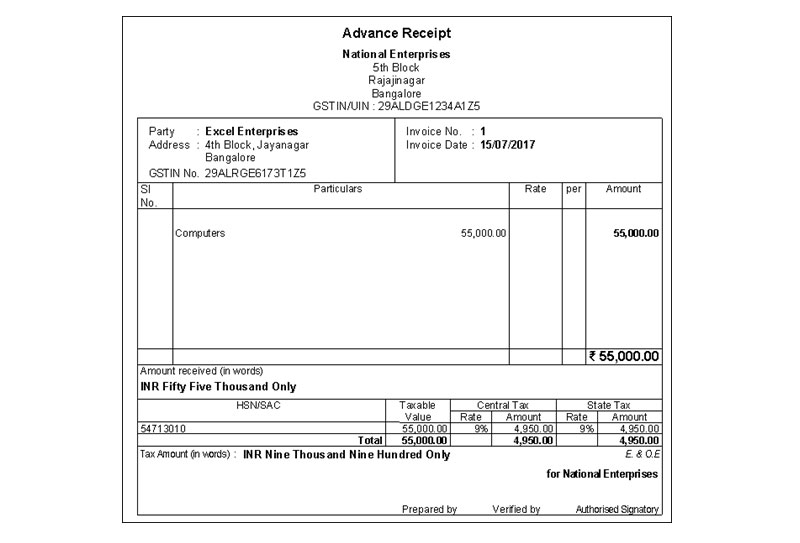
Format of the Receipt Voucher?
Now, Let us see the format of the receipt voucher.
The format of Receipt Voucher has been provided by the CGST Rules, 2017:
Name, address, and GSTIN of the supplier
Serial number
Date of its issue
Name, address and GSTIN or Unique Identity Number, if registered, of the recipient
Description of goods or services
Amount of advance taken
Rate of tax (central tax, State tax, integrated tax, Union territory tax or cess)
Amount of tax charged in respect of taxable goods or services (central tax, State tax, integrated tax, Union territory tax or cess)
Place of supply along with the name of State and its code, in case of a supply in the course of inter-State trade or commerce
Whether the tax is payable on reverse charge basis
Signature or digital signature of the supplier or his authorised representative:
How to raise Receipt Voucher using Reach ?
Now that you know what is receipt voucher and when it is issued.Let us see, How to raise a receipt voucher using Reach Accounting Software.
There are three types of receipt voucher :
Direct receipt voucher
Payment Against invoice
For Advance against invoice
In most of these scenarios, the payer will request a receipt from you.
Direct receipt voucher
A direct receipt voucher is made to acknowledge a cash sale, sale of an asset or any other windfall receipts. This attracts taxes as well so its important to record this in reach. Receipt can be made as cash, cheques or by bank transfers.
Now let us see how a direct receipt voucher is made.
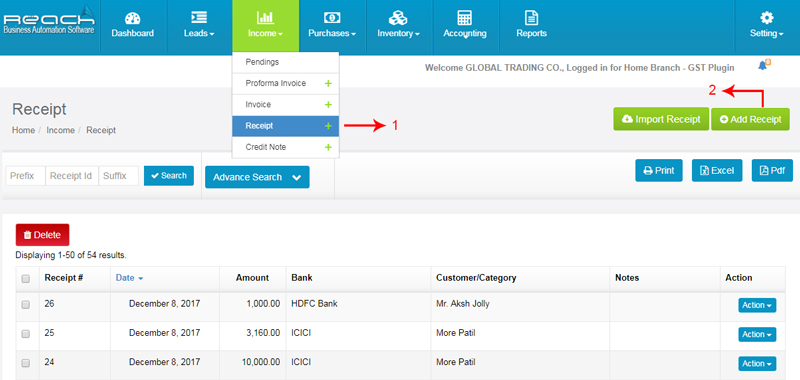
Go to receipt under income tab.
Click on add receipt.
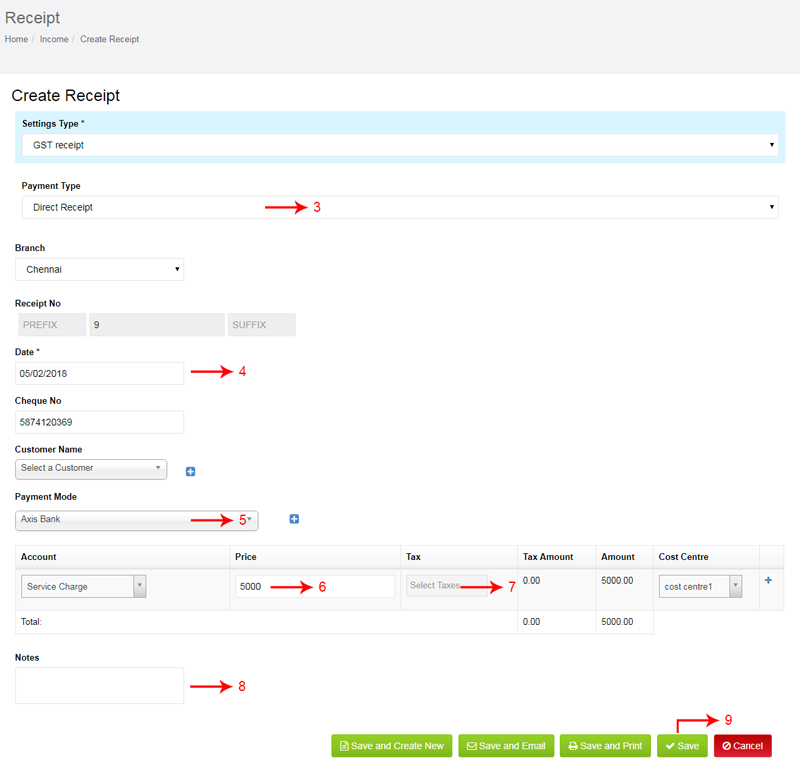
Select the direct receipt in payment type.
Select date.
Select Payment mode.
Now select the sales in account and give the amount.
In case you like to add taxes to the payments made, make sure the taxes are enabled while creating an accounting ledger.
Add a notes for your reference.
Payment added successfully.
Payment Against bill
A payment against invoice is made towards a credit invoice raised earlier to adjust the customer account for balance payments.
Let me show you how it's done.
Go to receipt under income tab.
Click on add receipt.
Select Payment against Invoice in payment type.
Now select date.
Give the cheque number.
Select the payment mode.
Mention the amount here.
Select the customer.
Add a note for your reference.
Reach automatically open and display all the outstanding invoices for that customer. Make sure you adjust each of the invoice which needs to adjusted.
Click save. Payment added successfully.

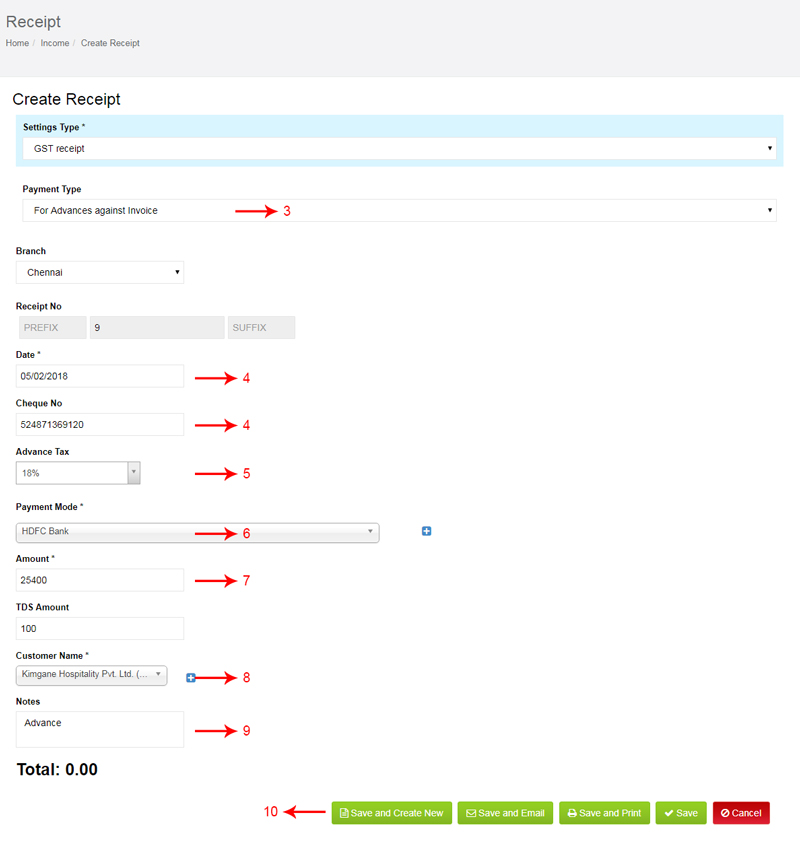
Advance against invoice
Manytimes advance payments are made in the course of normal trade. Such advances are adjusted against future invoices of the customer.
Now let me show you how advance payments are recorded in reach.
Go to receipt under income tab.
Click on add receipt.
Select for advance against invoice in payment type.
Now select date.
Give the cheque number.
Select the tax .After GST, these advances also attract taxes and hence it becomes important to record advances promptly.
Now select the mode of payment.
Mention the amount here.
Select customer.
Add a note for your reference.
Click save Payment added successfully.
Reach automatically creates relevant accounting entries in the Daybook, ledgers, Financial and Tax Statements as well, so you can save time on separate accounting entries.
In this section, Lets learn about credit notes and its usage.
Learning Objectives:
What a credit note is and when it is issued?
How to prepare a credit note using Reach Accounting Software?
How to prepare a credit note in Reach Software?
When you return your goods to a nearby store, the shopkeeper sometimes would give you a receipt which you can use to exchange or set-off against future purchases. This receipt is known as a credit note.
In business, Credit notes are issued for the following reasons:
For Sales Returns
To provide a Sales Discount which was not known at the time of making the Invoice
To account for shortages in delivery
Credit notes can be adjusted against current outstanding Invoices or might be allowed to be set-off against future Invoices. Sometimes, it might be followed with a cash refund too.
What is a Credit Note?
Explain the following scenarios
Adjusting the credit note against an existing Invoice
Adjusting an Invoice against a credit note
Making a refund payment against a credit note
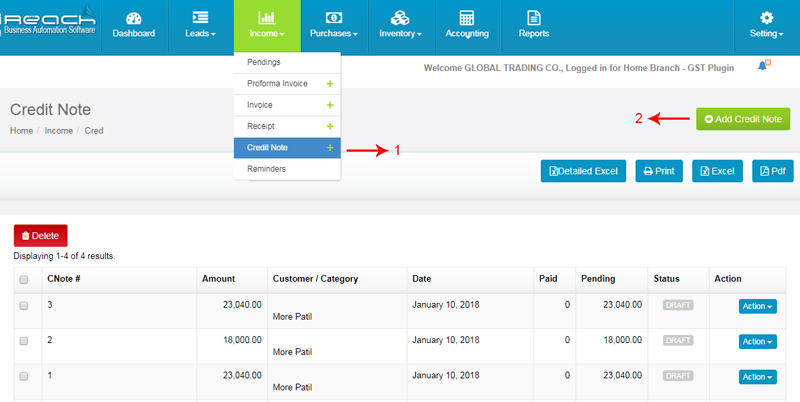
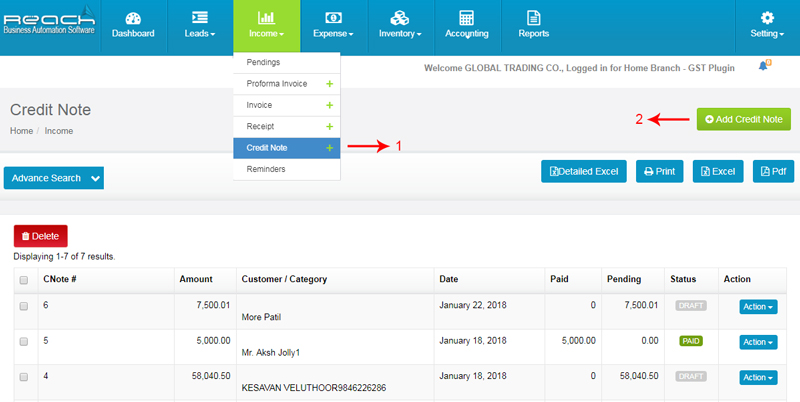
1. Adjusting the credit note against an existing Invoice
Go to credit note under income tab.
click on add credit note.
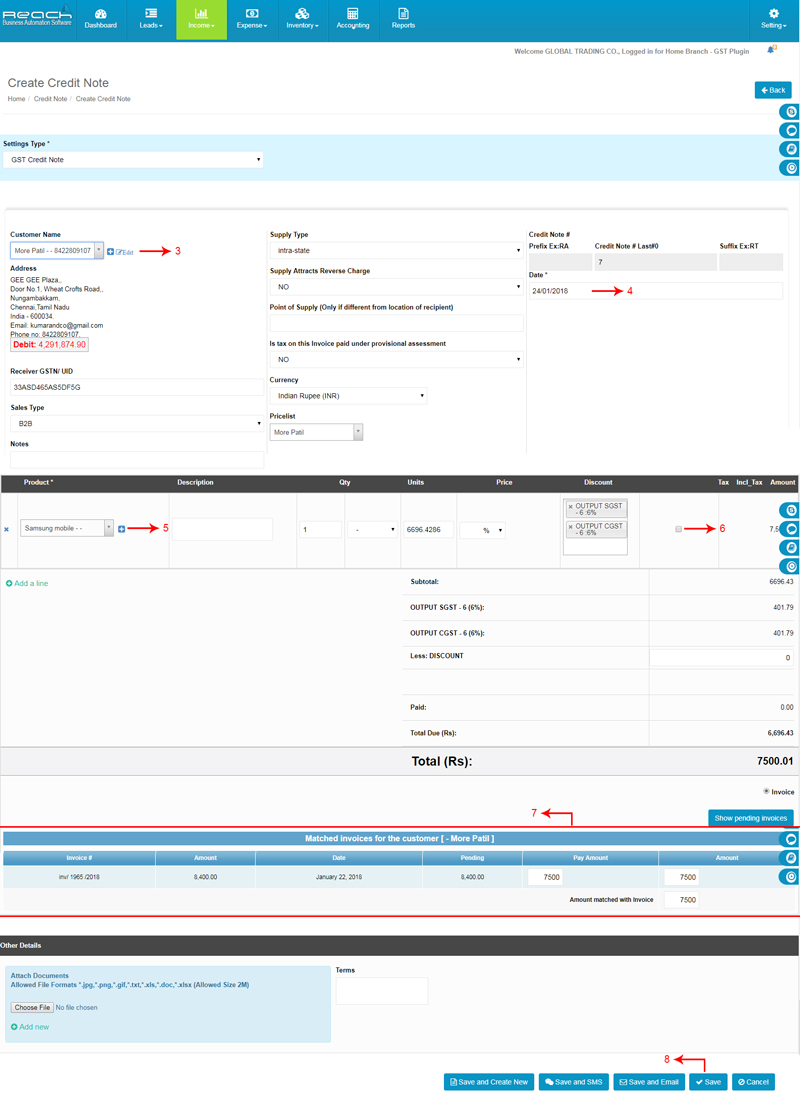
Choose the customer to whom you are raising an credit note. Reach will automatically populate the customer’s details.
Select date.
Select products details.
Enable the checkbox.
Reach automatically open and display all the invoices for that customer. Make sure you adjust each of the invoice which needs to adjusted.
Click save.
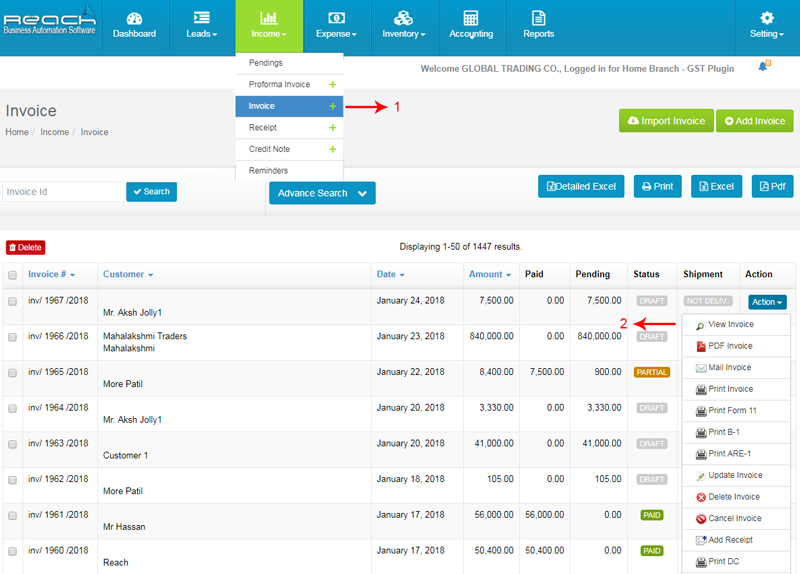
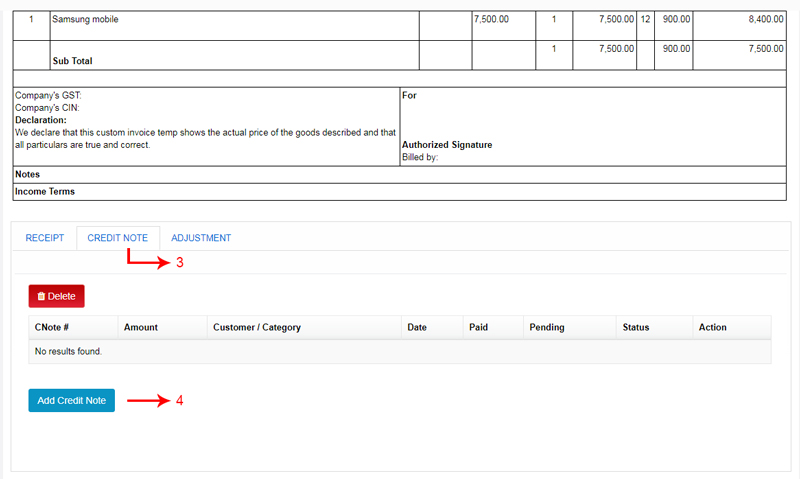
2. Adjusting an Invoice against a credit note
Click invoice under income tab.
Click view invoice and scroll down.
Click credit note.
Add credit note.
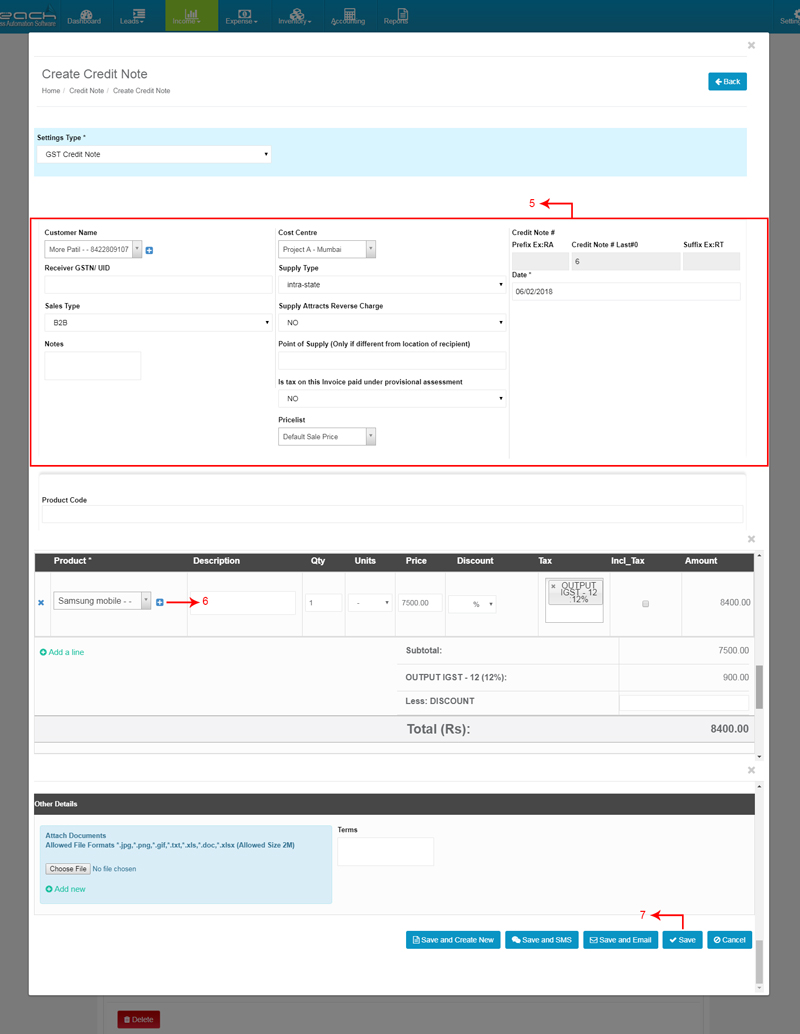
Now credit note page appears. Reach will automatically populate the customer’s details.
Select products details
Go to save.
3. Making a refund payment against a credit note
Go to credit note under income tab.
click on add credit note.
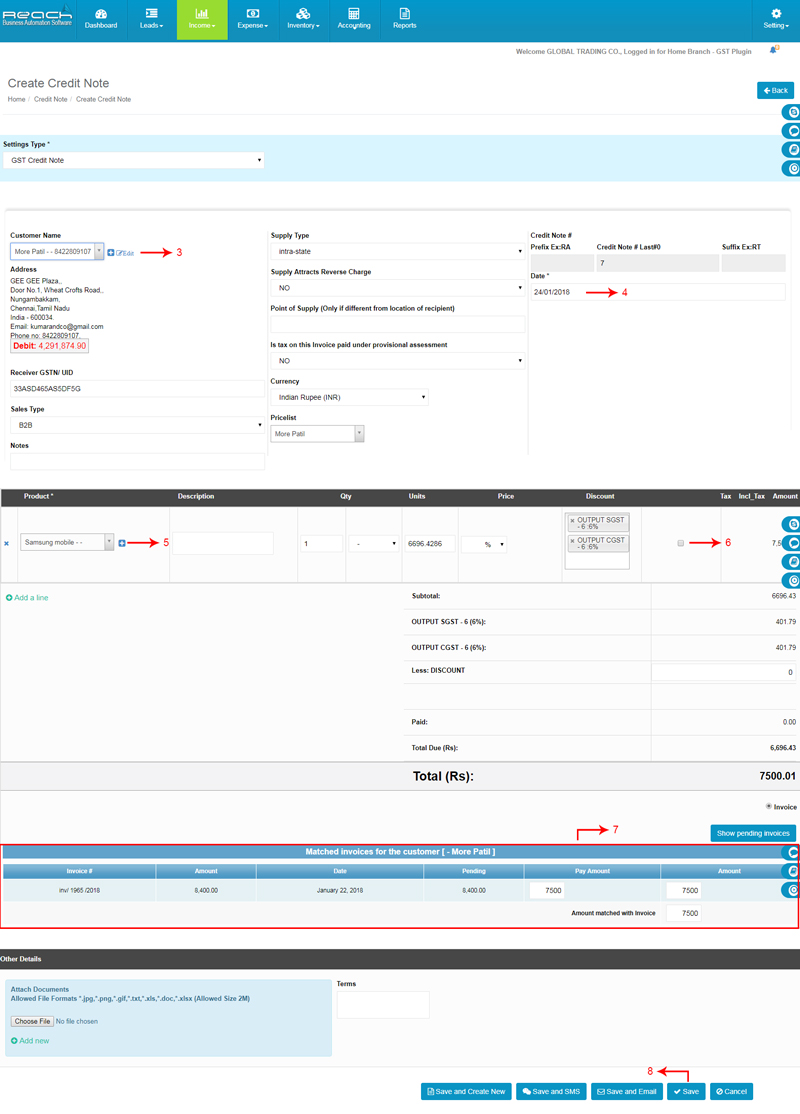
Choose the customer to whom you are raising an credit note. Reach will automatically populate the customer’s details
Select date.
Select products details
Enable the checkbox
Reach automatically open and display all the invoices for that customer. Make sure you adjust each of the invoice which needs to adjusted.
Click save.
Go to action button and click add payment.
Now payment page appears. Add payment details.
Click save.
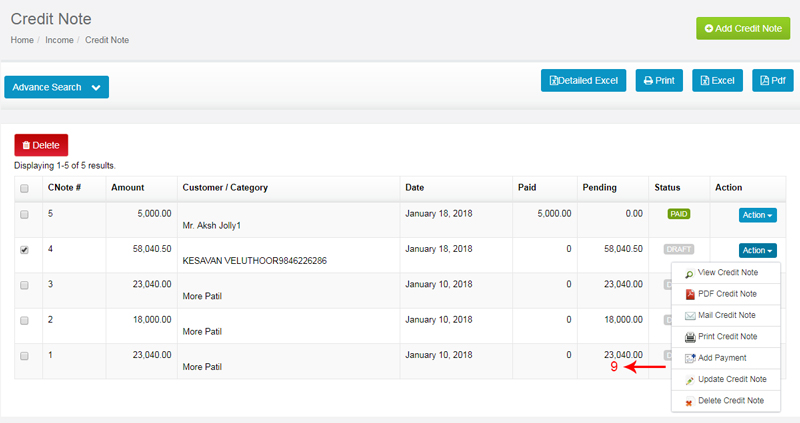
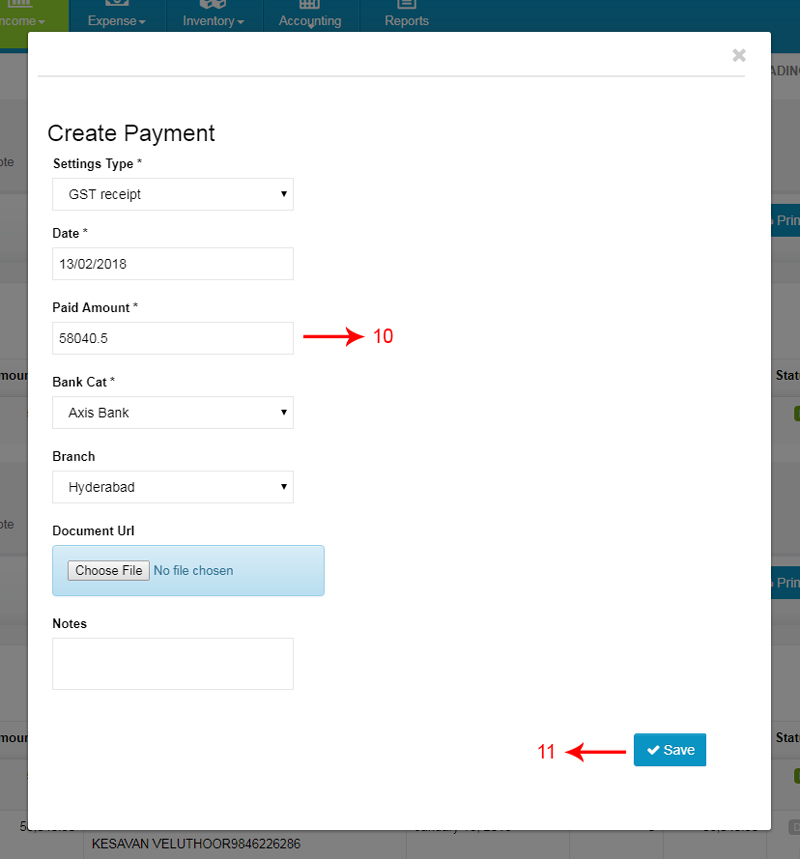
Know credit note Status will change paid
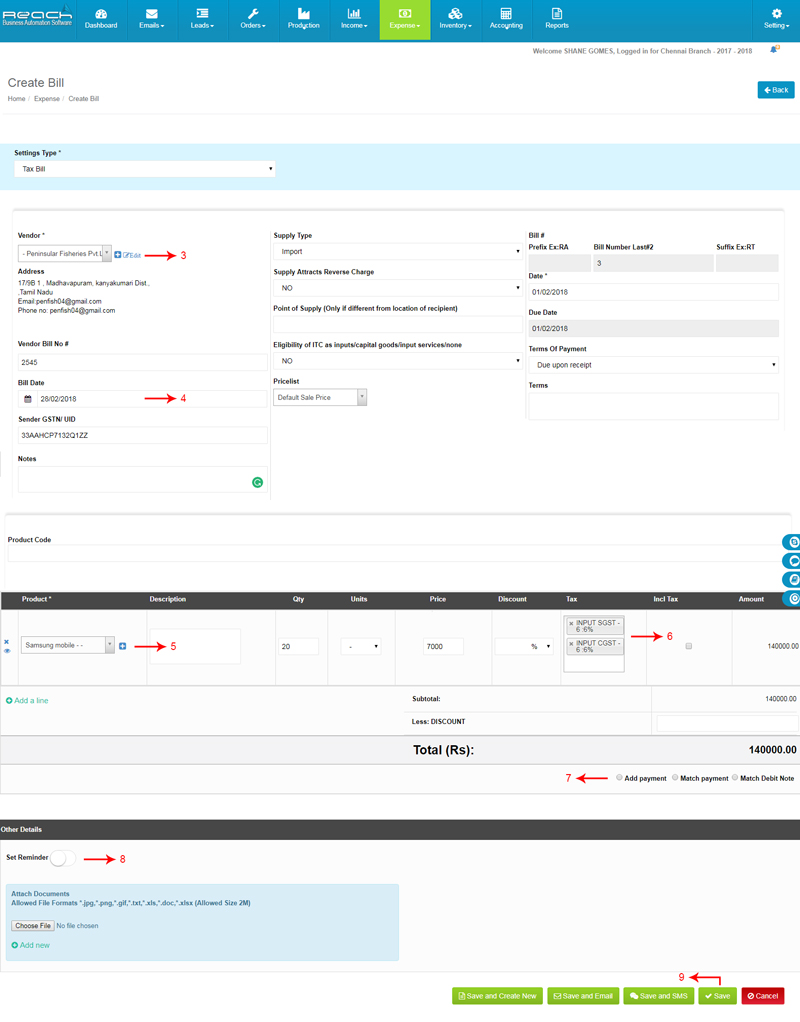
Supplier Bills
When you buy goods in the due course of business, you supplier raises an Invoice demanding a payment for the same. The Invoice generally specifies the payment terms and taxes for which Input credit can be claimed. This Invoice needs to be recorded in the Accounting Software as soon as it is raised. Recording the Invoice helps you understand your Financial Status correctly.
Let me now show you how a supplier Invoice can be recorded in Reach.
Go to Bill under expense tab.
Add Bill Button
Select vendor details.
Bill date
Once marked, you can start adding all the products.
While adding products, you can choose taxes.
Once a Bill is completed, you can now create a payment for the bill (or) adjust the bill against advance payments (or) outstanding debit notes
Reach also has the option of pre-setting reminders for your bills through email and sms.
Click save

Payment Vouchers
Now let us learn what is Payment Voucher is and How to raise payment using Reach, Cloud Accounting Software.
Learning Objectives
what is Payment Voucher and When Should Payment Voucher be Issued?
How to raise the Payment voucher using Reach software?
Where to check the Payment report?
What is a payment voucher?
In the course of business multiple payments are made everyday. For example, Payments are made for Salaries, Travelling and Other office expenses. Payments are also made towards buying assets for the business. Payments can be made towards a current expense, as an advance to a supplier or towards an outstanding supplier Invoice. Payments are mostly made in cash, cheque or as Bank transfers. Everytime a payment is made, A voucher has to be prepared in the accounting software and be attested by the payee. This is to have a proof of payment for audit and tax reasons.
How to raise a payment voucher using Reach Software?
Now that you know what is Payment voucher and when it is issued.Let us see, How to raise a Payment voucher using Reach Accounting Software.
There are three types of payment voucher.
Direct Payment Voucher
Payment Against bill
For Advance against Expense
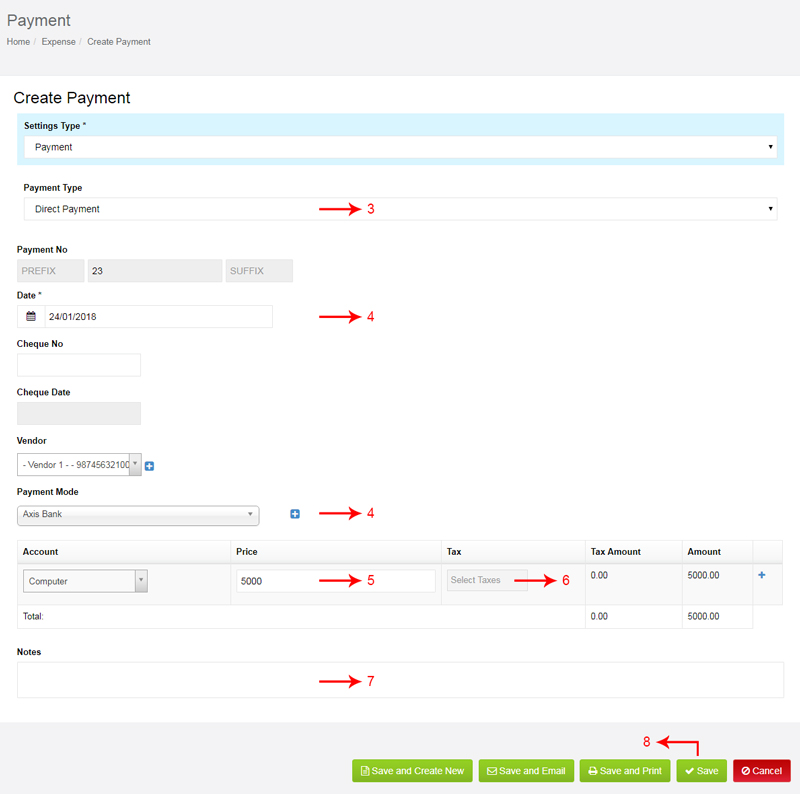
Direct Payment Voucher
First, I will show you how a Direct Payment Voucher is made. You should create a direct payment voucher for recording cash expenses like travelling, office expenses and wages. Now let see how to raise direct payment voucher.
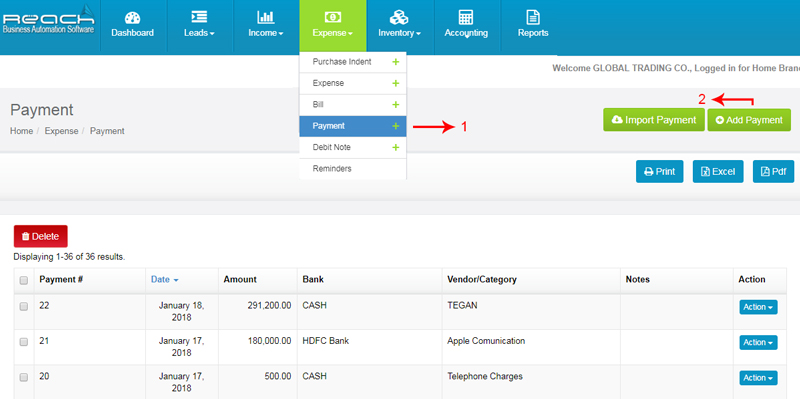
Go to payment under expense tab.
Click on add payment button.
Select the direct payment in payment type.
Select date and payment mode.
Now select the expense in account and give the amount.
In case you like to add taxes to the payments made, make sure the taxes are enabled while creating an accounting ledger.
Add a notes for your reference.
Now Click Save. Payment added successfully.
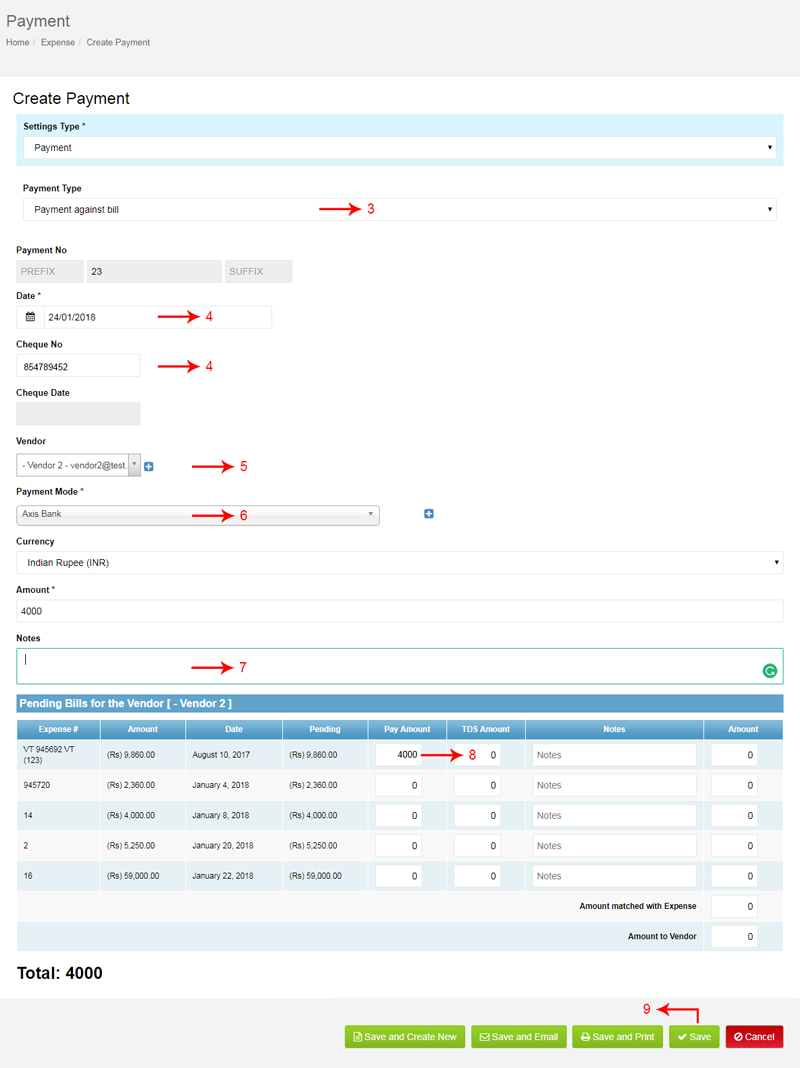
Payment Against bill
Next, Let us see how a payment against a previously recorded bill is made. Such payment is made if the supplier has issued a bill already which has been recorded in Reach Software and subsequently payment is made on the due date.
Go to payment under expense tab.
Click on add payment button.
Select Payment against bill in payment type.
Give the cheque no and date.
Select vendor.
Mode of payment.
Add a note for your reference.
Now adjust the amount here.
Now Click Save. Payment added successfully.
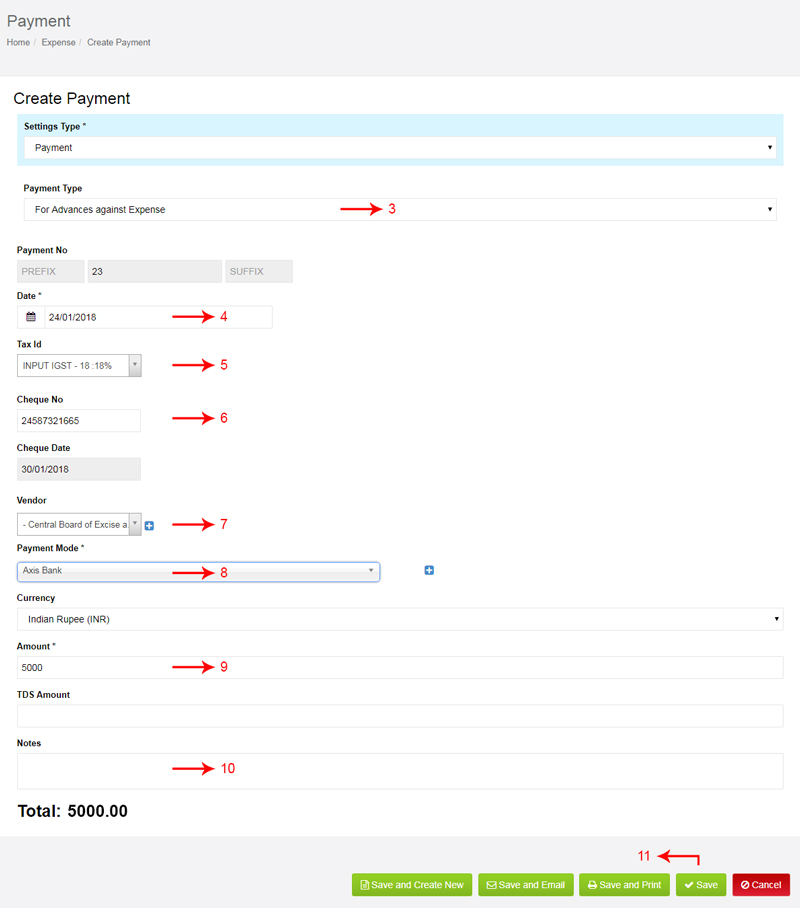
For Advance against Expense
Now let us see how an Advance made against an expense is recorded in Reach Software. In the course of business, we might come across a scenario where we make some advance payments to suppliers which gets adjusted later when the supplier sends a bill.
Go to payment under expense tab.
Click on add payment.
Select for advance against bill in payment type.
Now select date.
Select the tax .After GST, these advances also attract taxes and hence it becomes important to record advances promptly.
Give the cheque number.
Select Vendor.
Now select the mode of payment
Mention the amount here.
Add a note for your reference.
Click save Payment added successfully.
Once Bill are made, the Collection Report gets updated automatically in Reach. The Overdue bill reports are adjusted too.
Now let us learn about debit notes and its usage.
Learning Objectives
What a debit note is and when it is issued.
How to prepare a debit note using Reach Accounting Software.
What is a Debit note? When is it issued?
In the course of business, many times we return the goods purchased from the supplier.
Debit notes are issued:
For Purchase Returns
To provide a upward revision of Invoices
To account for shortages in delivery
Debit notes can be adjusted against current outstanding supplier bills or might be allowed to be set-off against future Bills.
Sometimes, it might be followed with a cash refund too.
How to prepare a debit note in Reach Software
Show how to setup a debit note template.
Explain how to map it to a particular accounting ledger.
Show how to raise a debit note and print.
Explain the following scenarios.
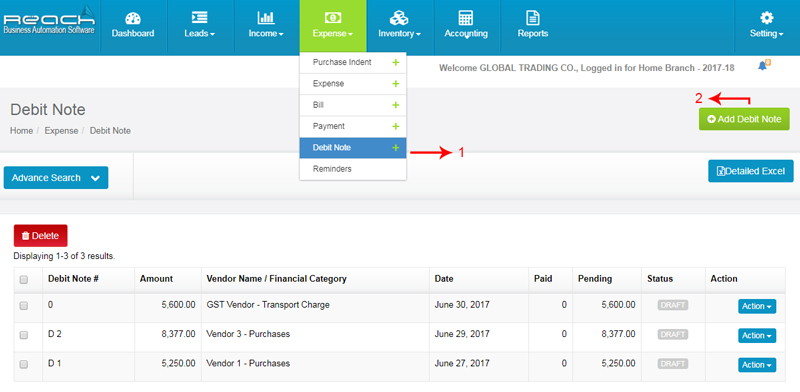
Adjusting the debit note against an existing bill
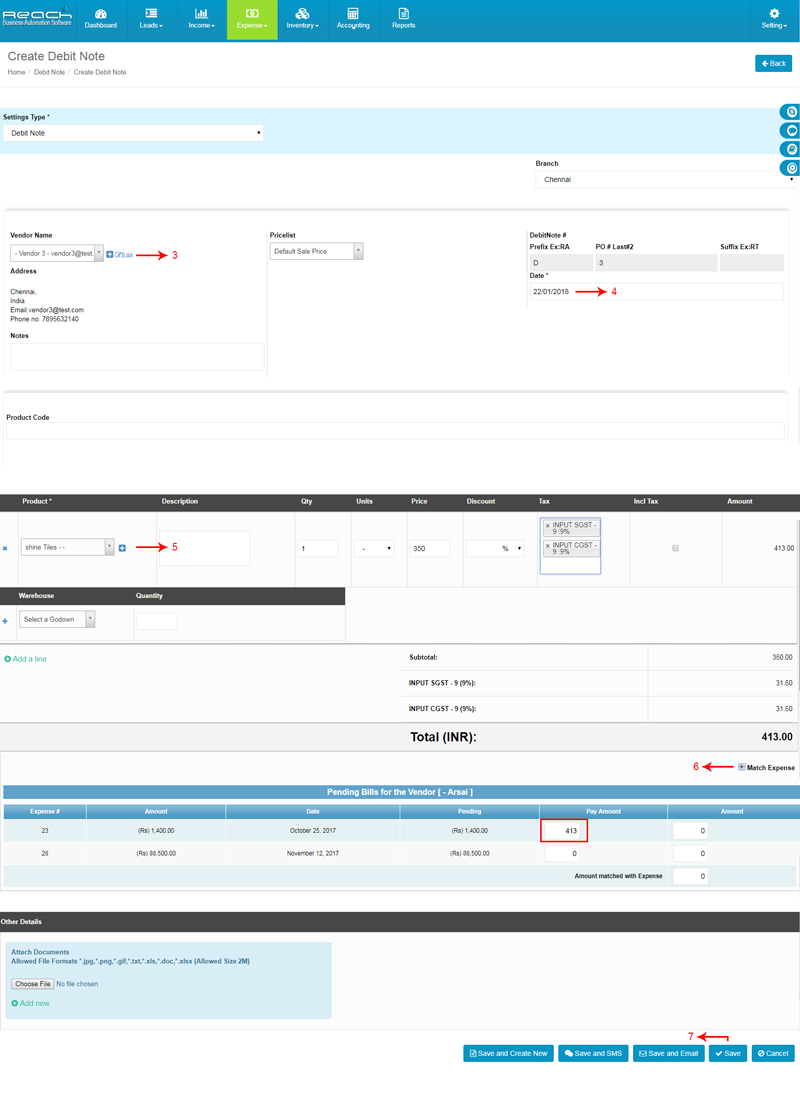
Go to debit note under expense tab.
Click on add debit note.
Choose the vendor to whom you are raising an debit note. Reach will automatically populate the vendors details.
Select Date.
Select products details.
Enable the checkbox to match expense. Reach automatically open and display all the Bill for that vendor. Make sure you adjust each of the bill which needs to adjusted.
Click save.
To account for shortages in delivery
Adjusting an Bill against a debit note - option Removed by product team
Making a refund payment against a debit note
Go to debit note under expense tab
Click on add debit note.
Select vendor name and Date.
Select products details.
Enable the checkbox.Reach automatically open and display all the Bill for that vendor. Make sure you adjust each of the bill which needs to adjusted.
Click save.
Go to action button and click add receipt.
Now payment page appears, add payment details.
Click save

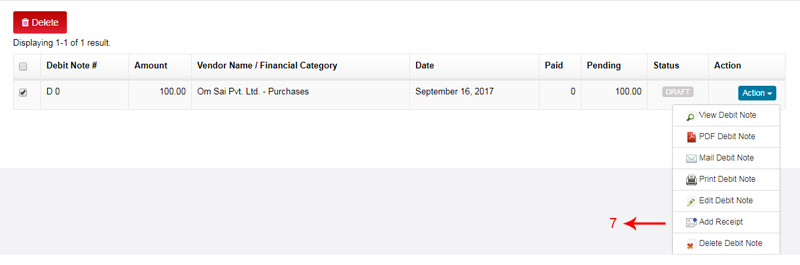
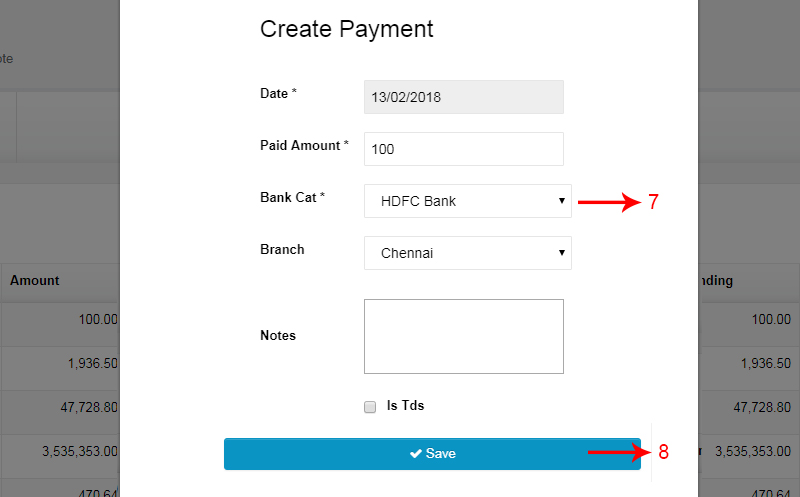
Know credit note Status will change paid
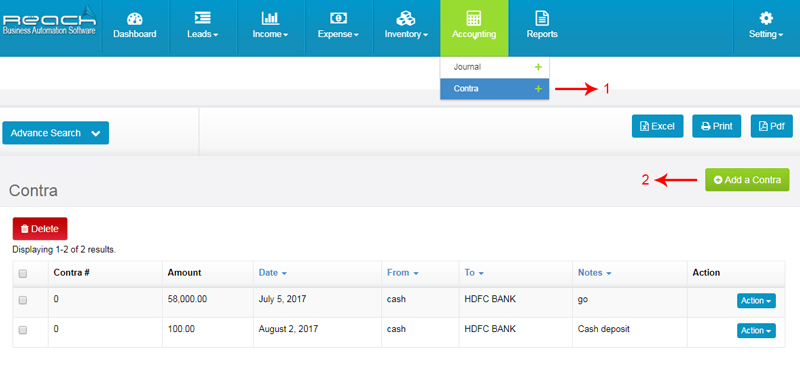
Recording Bank Deposits
In the normal course of business, you will be depositing Cash and Cheques collected from the customer into the Bank Account. This needs to be recorded into the Accounting Software.
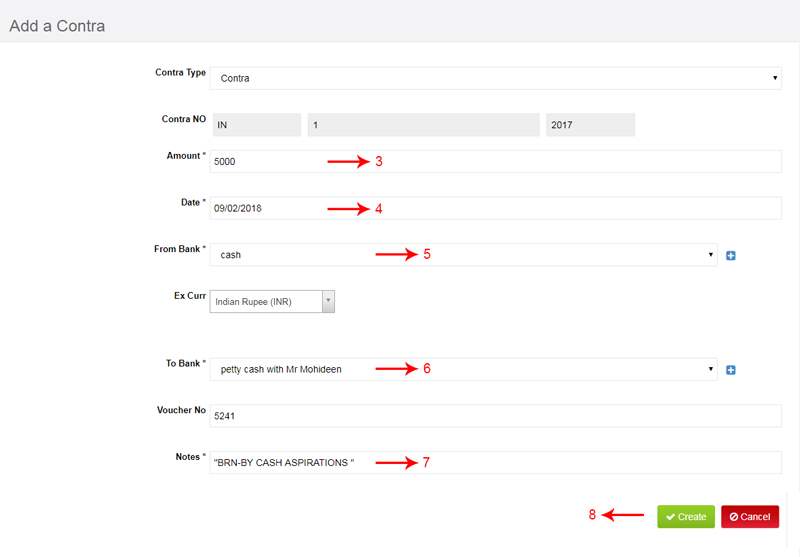
Let me now show you how a bank deposit is recorded in Reach Accounting Software.
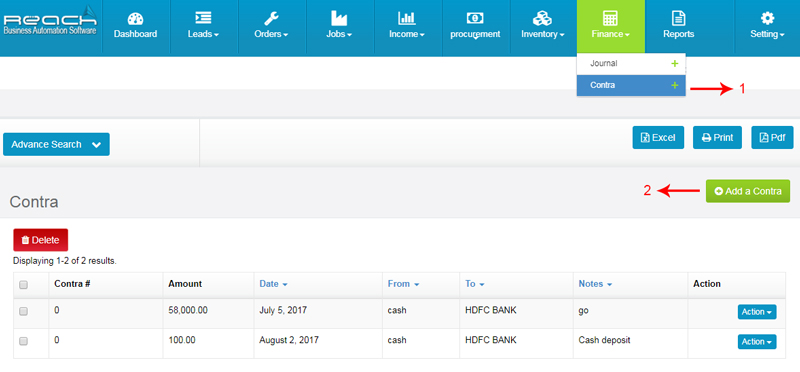
Go to contra under account tab.
Add contra.
Select Amount.
Select Date.
From cash and To Bank name.
Add a notes for your reference.
Click create. Payment Deposited successfully.
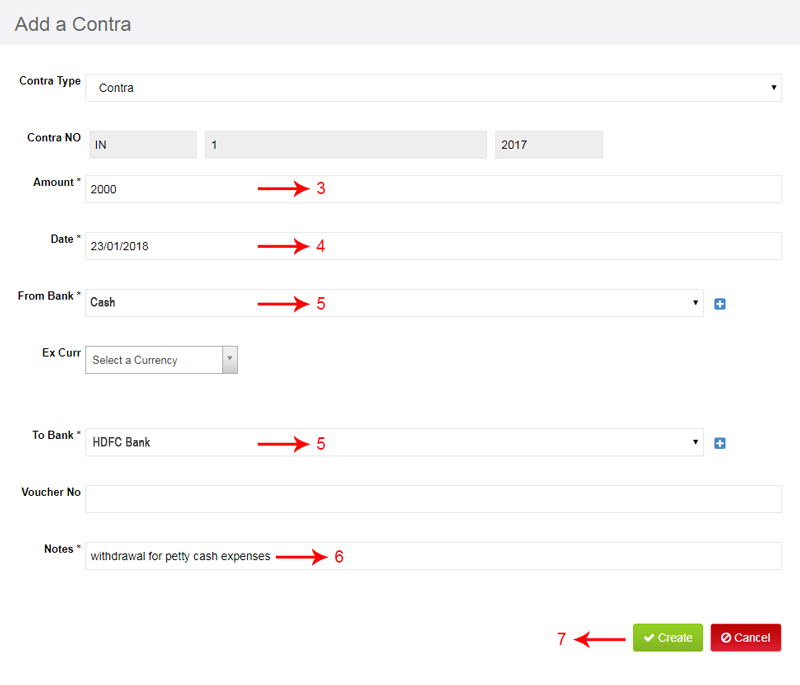
Recording Bank Withdrawals
Often, Cash is withdrawn from the Bank account for Petty Cash Expenses or to make other payments in Cash. When Cash is withdrawn from the bank, It needs to be recorded into the Accounting Software. Let me now show you how a Bank withdrawal in Reach Accounting Software
Go to contra under account tab
Add contra.
Select Amount.
Select Date.
Select from bank name and To cash.
Add a notes for your reference.
Save payment Withdrawals successfully.
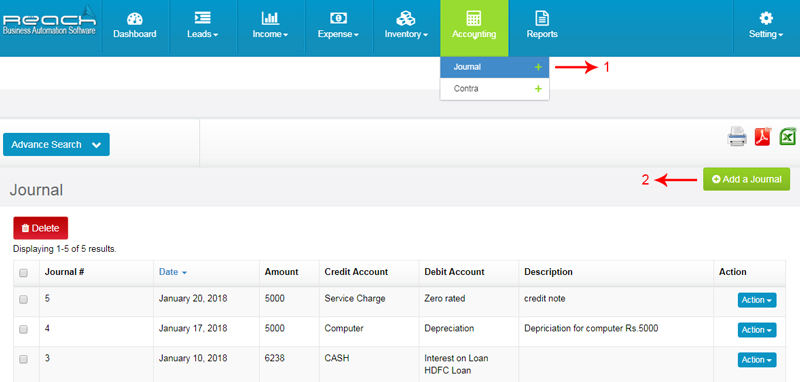
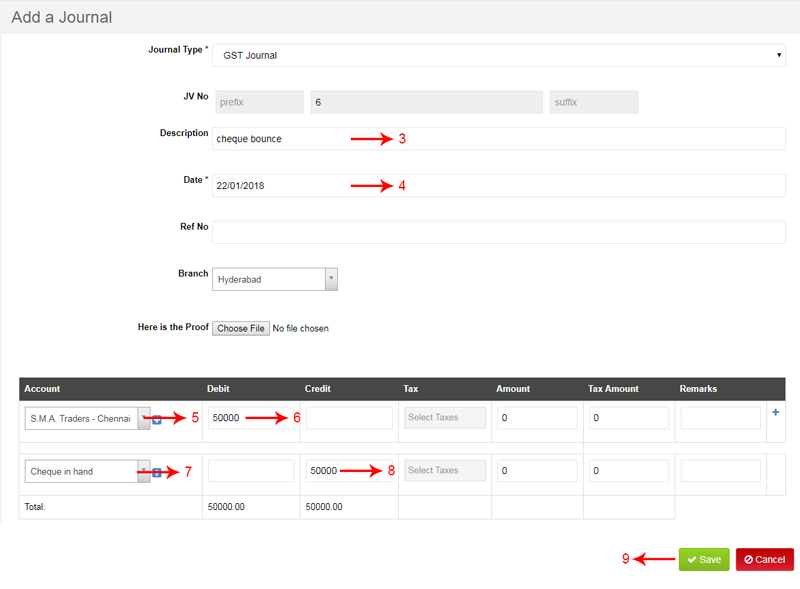
Recording Cheque Returns
Since we record every cheque which is deposited into the bank, it is important to reverse it if the cheque issued by a customer returns from the bank. This means that the customer account has to be reversed and the Bank balance reduced. Now, I will show you how a Cheque return is recorded in Reach Accounting Software.
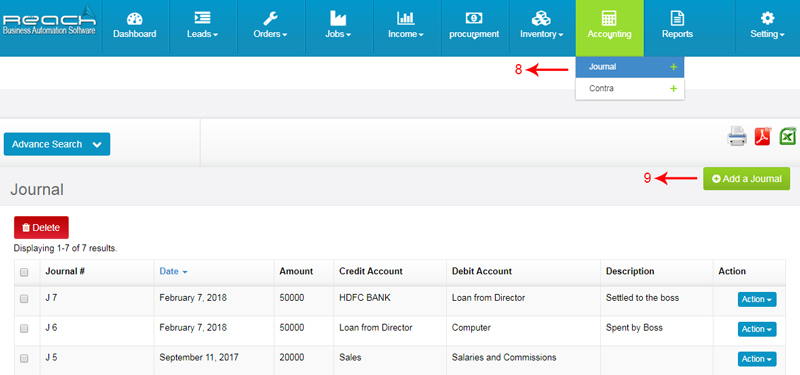
Go to journal under accounting tab.
Click on add journal.
Now Add Description.
Select date.
Select customer name.
Add debit amount.
Select cheque in hand ledger.
Add credit amount.
Click Save.
Reconciling Bank Transactions
The Balance shown in the Bank Ledger of the software and the Actual Balance in the Bank does not tally often.
In most cases, This is due to the following reason:
The time delay on the deposited cheques to be cleared.
The time delay on the issued cheques to hit the account.
Bank charges levied by the Bank.
At the end of every month, it is habitual to do a Bank Reconciliation to ensure that these transaction are accounted and to ensure that the Bank Account shows a true and correct picture.
Now I will show you how a Bank Reconcilation is done using Reach Accounting Software
Go to reports.
Click Bank Reconciliation Report under Accounting Reports.
Search date and cheque number.
Go to select cheque clearance date
Now Click Reconciliation report
Here you can see the total number of cheques. i.e., Cheque issued, cleared and non cleared .
Finally you can see your "balance as per bank statement".
Recording Staff Salary Advances
In the normal course of business, you will be issuing Advances to your Staffs against Salary or for Expenses. This needs to be recorded into the Accounting Software.
Let me now show you how a Staff Advance is recorded in Reach Accounting Software.
Go to Journal under accountant tab
Click add journal option and add Salary Advances entory
Add a Description for your reference.
select the Date, Ref No, Here is the Proof
Now select Staff Salary Advances ( current liability) and add amount under debit column
Select bank or cash and add amount under credit column
Click save
Now go to Journal under accountant tab
Click add journal option now add salary
Add a Description for your reference.
select the Date, Ref No, Here is the Proof
Select Salary ledger and add Total salary amount under debit column
Now select Staff Salary Advances ( current liability) and add advances amount under Credit column
Select bank or cash and add amount under credit column
Then save

Recording Salary and Wages
Now, Let me show you how monthly Salary and Wages due and paid can be recorded in Reach Accounting Software
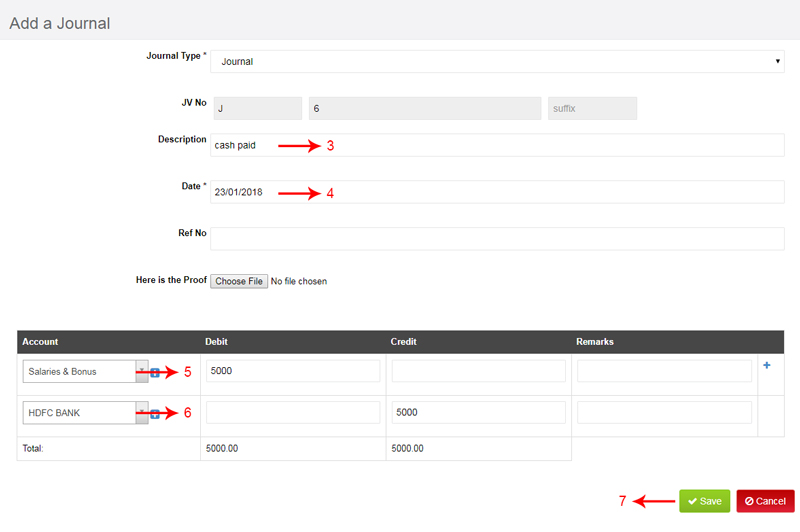
Now go to Journal under accountant tab
Click add journal option now add salary
Add a Description for your reference
Select the Date.
Select Salary ledger and add Total salary amount under debit column.
Now Select bank or cash and add amount under credit column.
Then save
Let me now show you how a Staff Advance is recorded in Reach Accounting Software.
Recording PF and ESI Payments
The PF and ESI due is recorded in Reach Software as explained in the previous segment. Payment of PF or ESI is done using a regular payment voucher.
Let me now show you how.
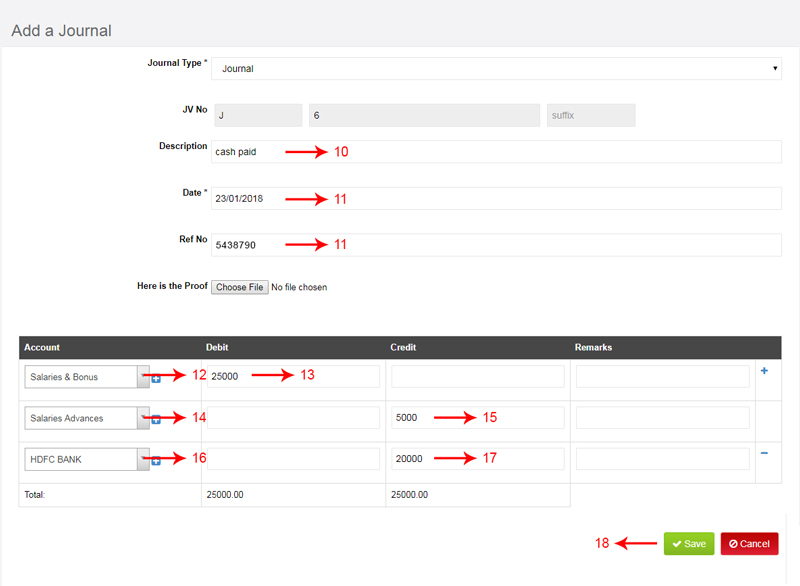
Now go to Journal under accountant tab
Click add journal option now add salary and PF,ESI entry
Add a Description for your reference.
Select the Date.
You can add the details of the new Ledger by clicking on the "+" button near the Ledger field.
Select Salary ledger and add salary amount under debit column.
Select bank or cash and add amount under credit column.
Select ESI Employee payables ( current liability) and add amount under Credit column.
Select PF Employee payable ( current liability) and add amount under Credit column.
Then save
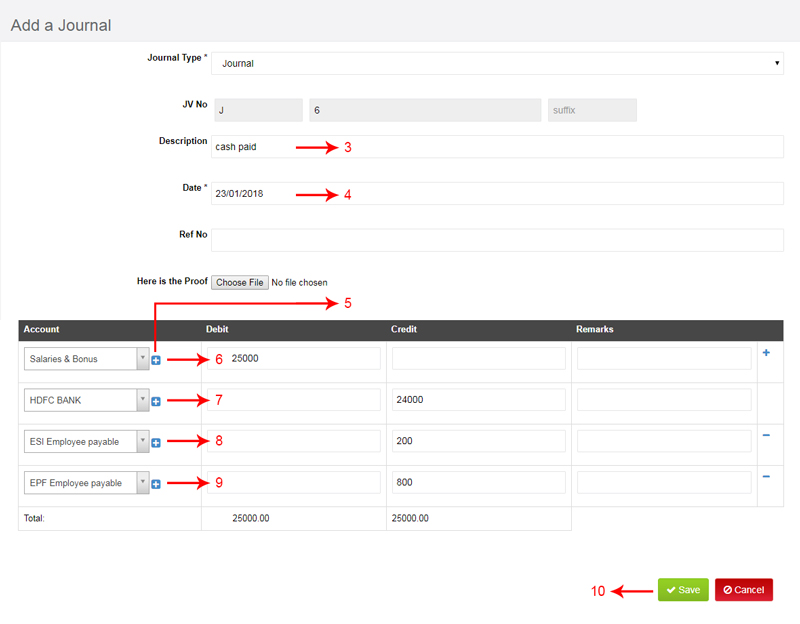
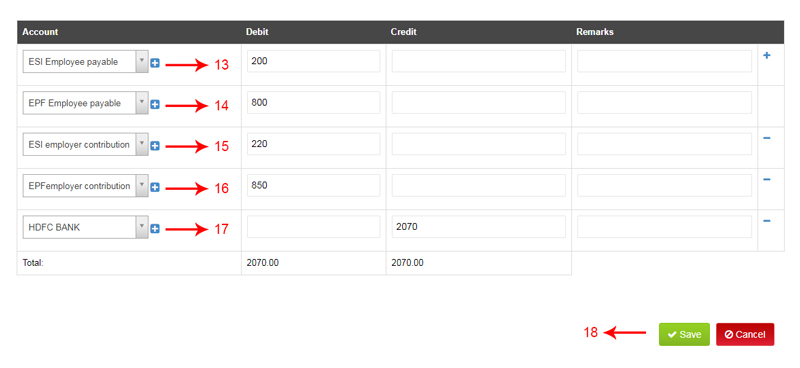
Now go to Journal under accountant tab
Click add journal option now add salary and PF,ESI entry
Select ESI Employee payable ledger and select amount under debit column.
Select PF Employee payable ledger and select amount under debit column.
Select ESI Employer contribution ledger and select amount under debit column.
Select PF Employer contribution ledger and select amount under debit column.
Select bank or cash and add amount under credit column
Then save
When You Make The Payment To Government, Now You Need To Pass Journal Entries.
Recording payments made to Owner/ Partner/ Director (salary)
When the owner makes payment to himself, it needs to be recorded in the Accounting Software.
If the organisation is a Proprietorship entity, The payments are recorded as "Drawings".
If the organisation is a Partnership, The payments are recorded as Partners Remuneration or Interest on Capital and adjusted to the Partners Capital Account.
If the organisation is a Limited Company, The payments are recorded as "Directors Remuneration" Now, Let me show you how these payments are recorded in Reach Accounting Software.
The question to how it should be recorded depends on the type of entity you are dealing with.
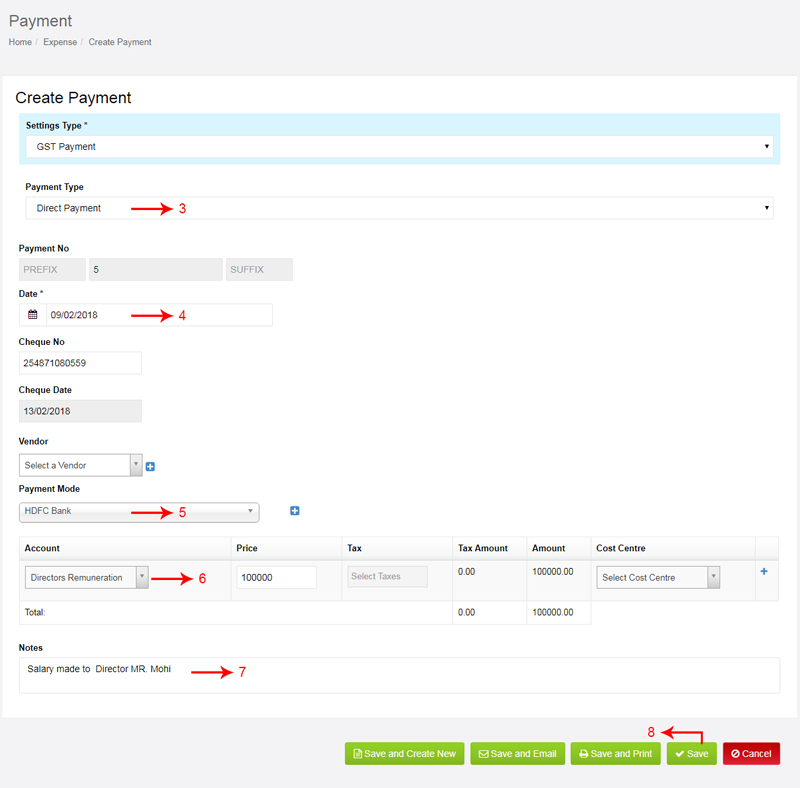
Director Salary
Go to payment under Expense tab
Click Add Payment
Select the direct payment in payment type.
Select date and payment mode
Now select the "Directors Remuneration ledger in account and give the salary amount.
Add a notes for your reference.
Now Click Save. Payment added successfully.
Petty Cash Management
Every business earmarks some cash for daily office expenses done in cash. The cashier is usually made responsible for this fund and day-to-day expenses are met out of this Imprest. This fund is refilled everyday or week once it is used. Let me show you how petty cash is accounted for.
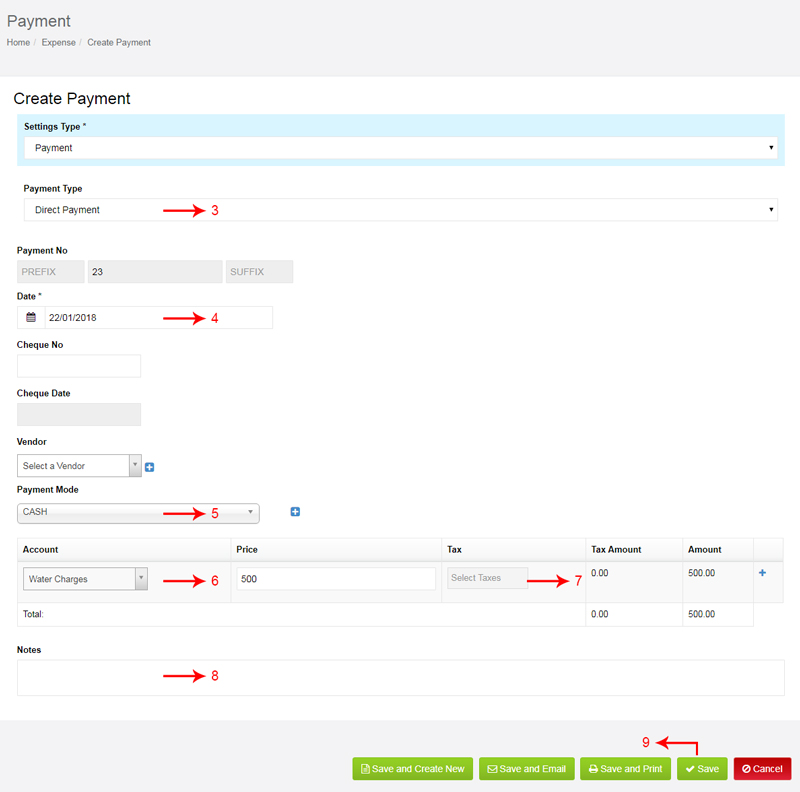
Go to payment under Expense tab.
Click Add Payment button.
Select the direct payment in payment type.
Select date.
Select payment mode.
Now select the Petty cash ledger in account Petty cash means daily office expenses(Water expenses, Tea,coffee expenses,travelling expenses,) and give the amount.
In case you like to add taxes to the payments made, make sure the taxes are enabled while creating an accounting ledger.
Add a notes for your reference.
Now Click Save. Payment added successfully.

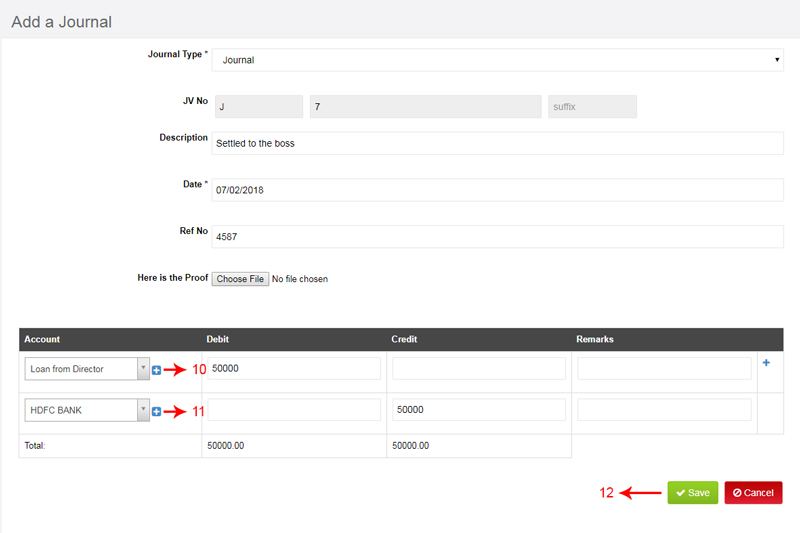
Expenses spent by Boss
Many times, The boss uses his personal credit card or cash to buy stuffs for the business. It gets settled to the boss and also needs to be recorded as a Business Expense. Now let me show you how such expenses are accounted for in Reach Software
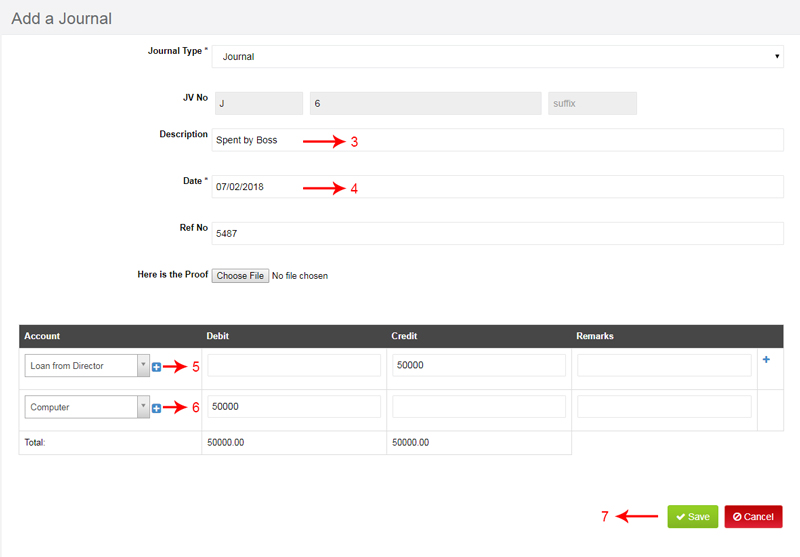
Go to journal under accounting tab.
Click on add journal.
Now Add Description.
Select date.
Select Loan from Director Ledger or Capital Ledger and Add credit amount.
Select Expenses Ledger and Add debit amount.
Now click Save.
Click journal under accounting tab.
Add Journal.
Now select Loan from Director Ledger and Add Debit amount.
Select Bank and Add credit amount.
Click Save.
When office will Settled to the boss, aghani go to add journal

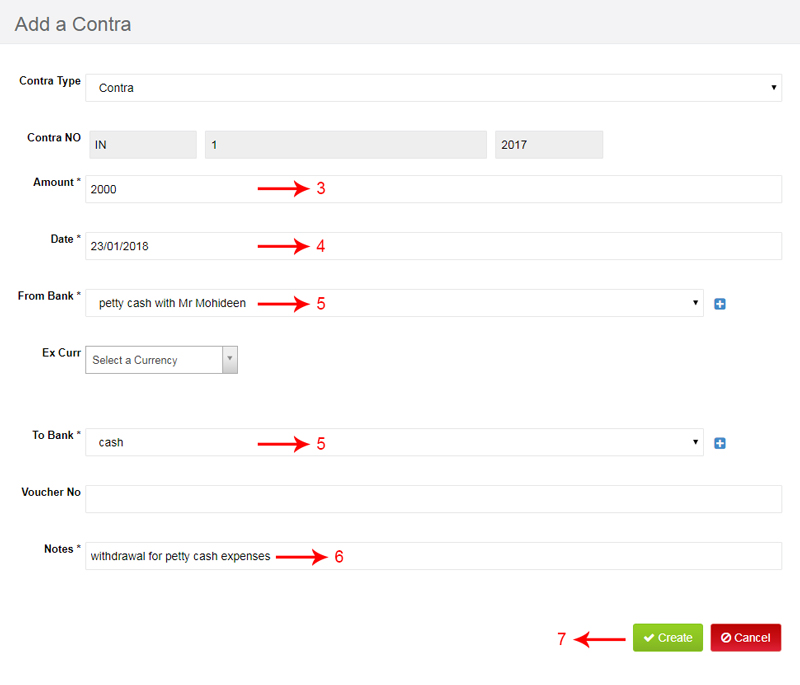
Advances given for Expenses
When you give Advance Imprest to Staffs for incurring some Cash expenses, it need to be accounted for. The cash holder might come back and provide bills for the same and return excess cash. This needs to be accounted too.
Now I will show you how this can be managed in Reach Software.
Go to Contra under accounting tab.
Click add contra button.
Add Advances Amount.
Select Date.
Select From Bank details.
Now select To Bank or cash.
Add a notes for your reference.
Click save.
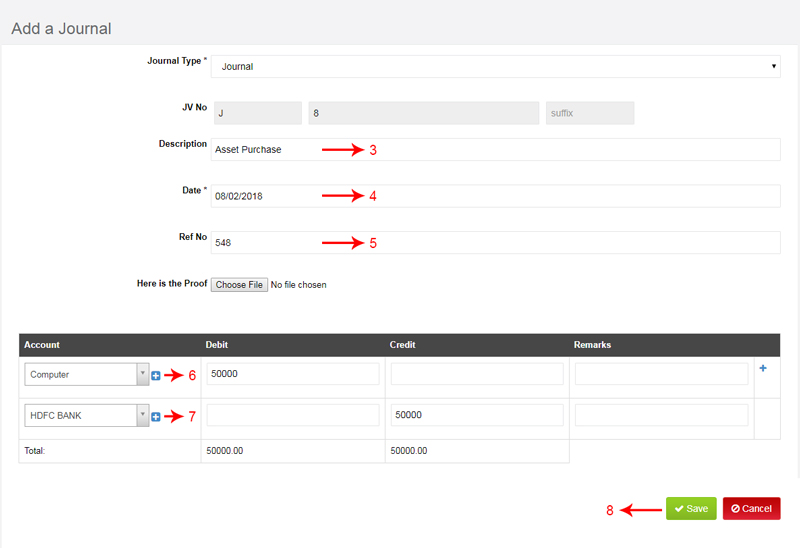
Recording Asset Purchase
When you buy a Fixed Asset, like machinery, furniture etc you incur ancillary expenses on it life transport, insurance, registration etc. All the expenses incurred till the point such asset is put to use is capitalised and added to the cost of the asset. This cost needs to be recorded in the Accounting Software.
Let me now show you how this is done:
Go to Journal under accountant tab
Click add journal Button
Add a Description for your reference.
Select the Date.
Fill the Reference Number and click Here is the Proof.
Now select fixed asset (Computer) and add amount under debit column.
Select bank or cash and add amount under credit column.
Click save.
Recording Asset Sale
When an Asset is sold, the receipt needs to be recorded in the software and any profits arising thereof recorded. Let me now show you how this transaction is recorded in the accounting software.
Let me now show you how this is done:
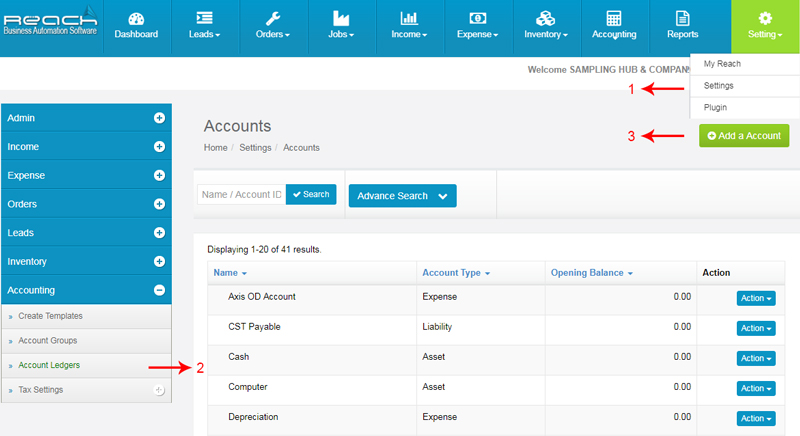
Click Settings, under Settings tab.
Click Account Ledger, under accounting tab.
Now click add a account button.
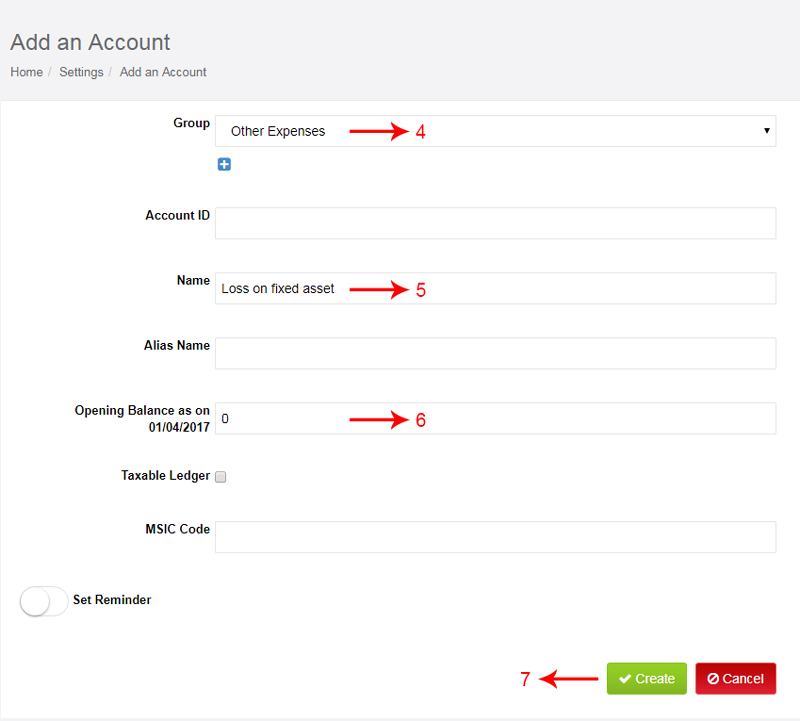
Then Select Group (Other expenses)
Add ledger name (loss on fixed asset).
Add Opening Balance( 0).
Now click create.
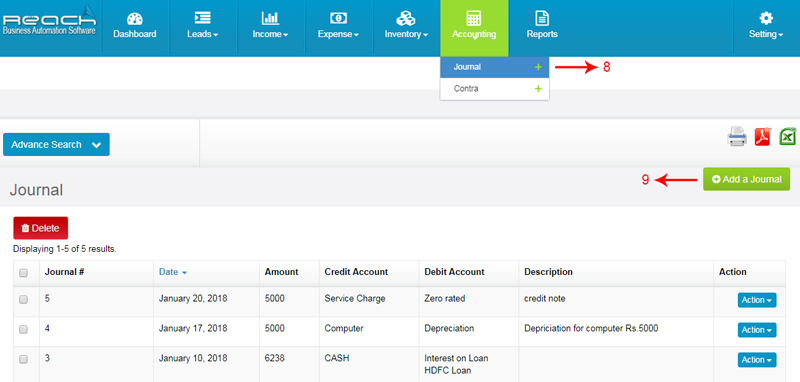
Go to Journal under accountant tab
Click add journal Button
Add a Description for your reference.
Select the Date.
Fill the Reference Number and click Here is the Proof.
Now select bank or Cash and add amount under debit column.
Select fixed asset (Computer) and add sale amount under credit column.
Now select loss on fixed asset ledger and add loss amount under credit column.
Then save.

Recording Depreciation
Depreciation is recorded in the software while doing the year end processing. This needs to be recorded at a fair percentage calculated according to the wear and tear or according to the prescribed laws.
Let me show you how depreciation is recorded in Reach Accounting Software.
Click Settings, under Settings tab.
Click Account Ledger, under accounting tab.
Now click add a account button.
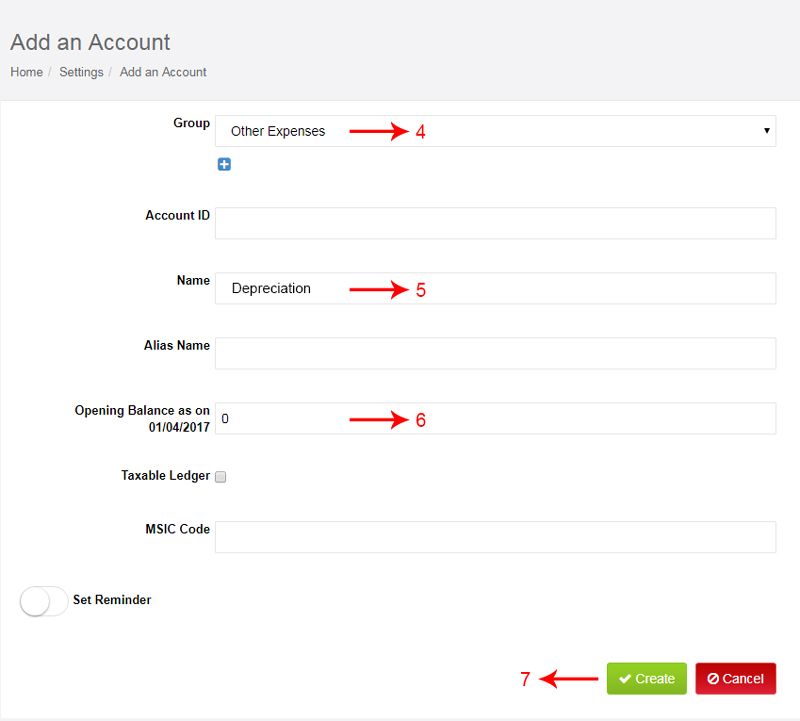
Then Select Group (Other expenses)
Add ledger name (Depreciation).
Add Opening Balance( 0).
Now click create.
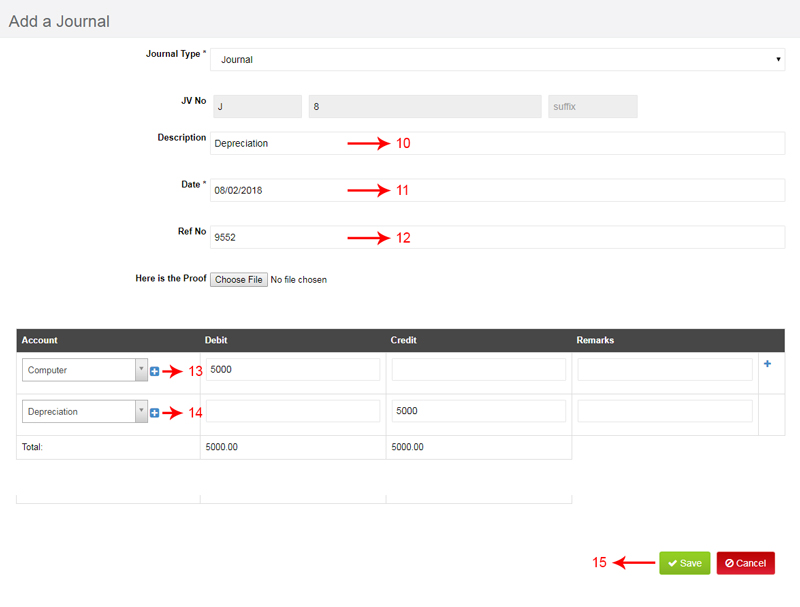
Go to Journal under accountant tab
Click add journal Button
Add a Description for your reference.
Select the Date.
Fill the Reference Number and click Here is the Proof.
Now select Depreciation ledger and add amount under credit column.
Select fixed asset (Computer) and add sale amount under debit column.
Then save.
Recording a Loan
A Loan or a Debt is raised for a business to finance its trade or Investment. Loans can be recieved as Term Loans, Asset Loans or Over drafts. When a Loan is recieved it has to be recorded in Reach Accounting Software.
Let me now show you how its done.
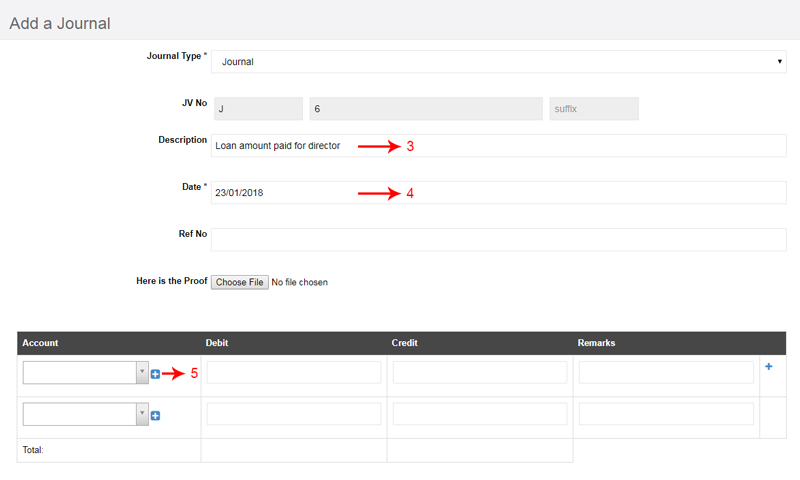
Go to Journal under account tab
Add Journal Button
Now add Description.
Then Select date.
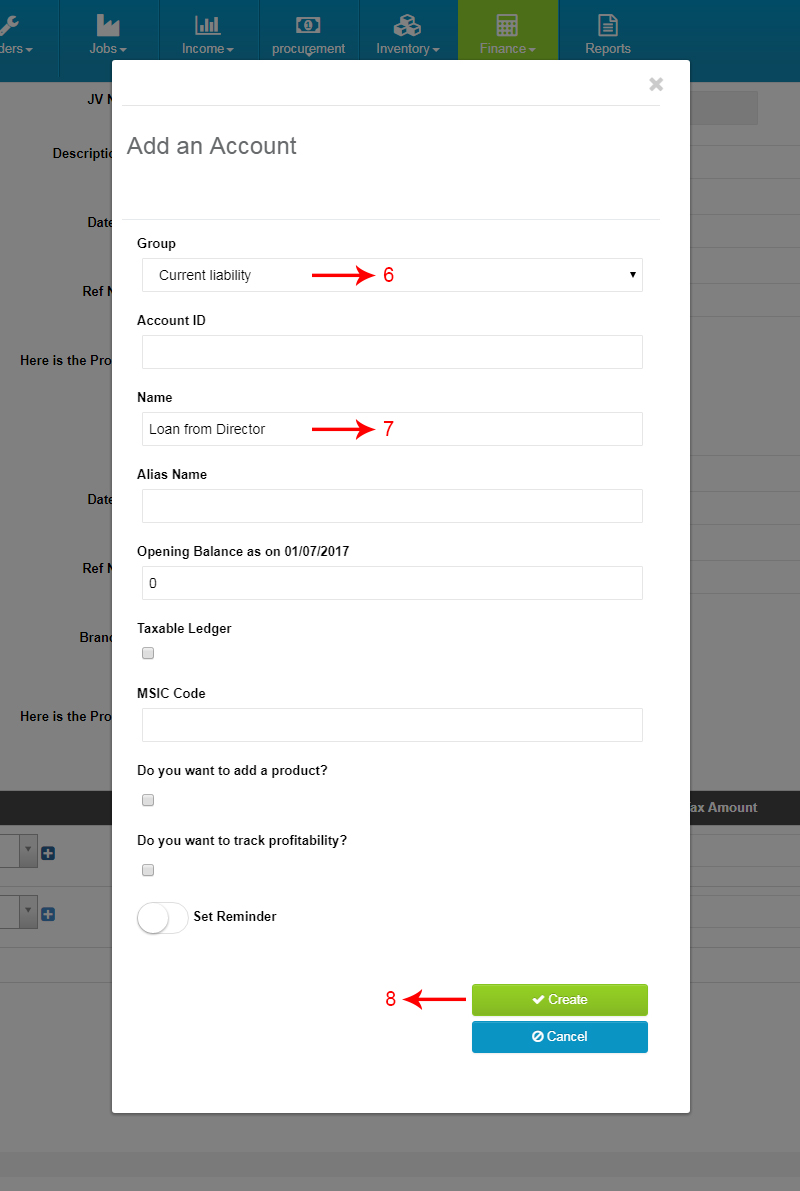
You can add the details of the new ledger by clicking on the "+" button near the account field.
Select group.
Then Add ledger name.
Now Click Create.
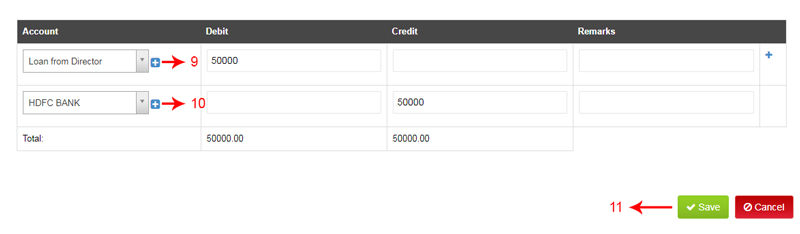
Now select Loan ledger and add amount under Credit column
Select bank and add amount under debit column.
Now Click Save.
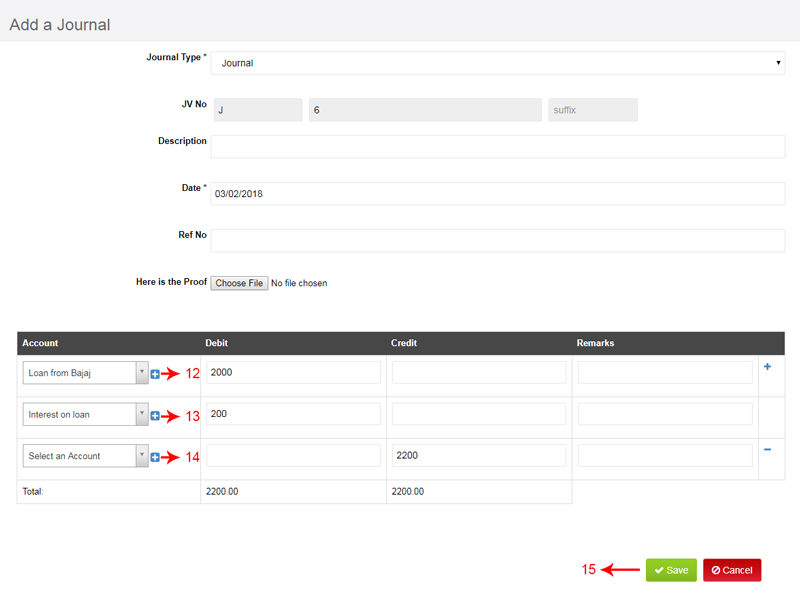
Recording an EMI Payment
When a term loan or an Asset loan is repaid in Equated Monthly Instalments, The payment includes both Principal and Interest repayments. We will have to calculate the Interest component in the EMI and record it as an Expense. The loan account has to be reduced to the extent of the principal component.
Let me now show you how its done.
Go to Journal under account tab.
Add Journal Button.
Now add Description.
Then Select date.
You can add the details of the new ledger by clicking on the "+" button near the account field.
Select current liability group.
Then Add ledger name.
Now Click Create.
Now select Loan ledger and add amount under Credit column
Select bank and add amount under debit column.
Now Click Save.
Select ledger (Loan from Bajaj) and add amount under debit column.
Then select Interest on loan and add amount under debit column.
Select bank and add amount under Credit column.
Now Click Save.


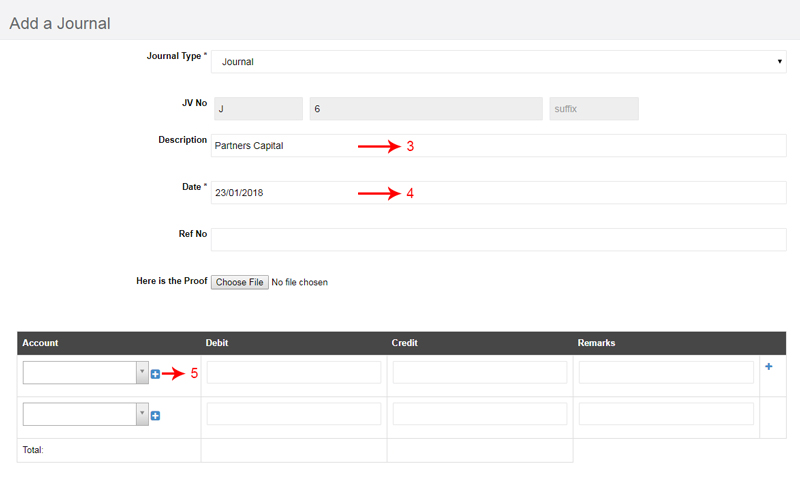
Recording Partners Capital
When the partner brings in Capital to fund the business, it needs to be recorded in the software. This transaction needs to be journalised and recorded to give effect in the Balance sheet.
Now let me show you how a capital is recorded.
Go to Journal under account tab.
Add Journal Button.
Now add Description.
Then Select date.
You can add the details of the new ledger by clicking on the "+" button near the account field.

Select Equity group.
Then Add ledger name.
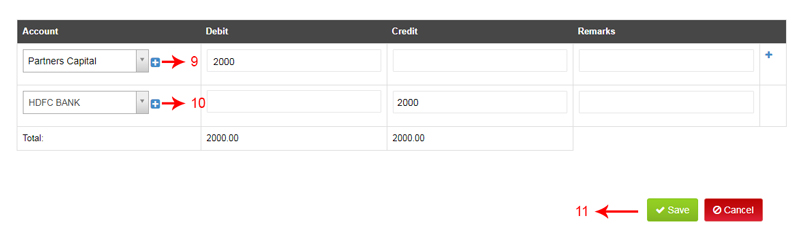
Now Click Create.
Select ledger (Partner Capital) and add amount under Credit column.
Select bank and add amount under Debit column.
Now Click Save.
/0.png)
/1.png)
/2.png)
/3.png)
/4.png)
/5.png)
/6.png)
/7.png)